In the previous articles, we showed how to copy data between different data stores, located in an on-premises server
or in the cloud
2.7k
By Raghvan Reddy
In the previous articles, we showed how to copy data between different data stores, located in an on-premises server
or in the cloud and how to perform data transformation on that data using the Azure Data Factory.
In this article, we will show how to run an SSIS package using the Azure Data Factory.
Azure SSIS Integration Runtime Setup
Azure SSIS IR is an Azure Data Factory fully managed cluster of virtual machines that are hosted in Azure and
dedicated to run SSIS packages in the Data Factory, with the ability to scale up the SSIS IR nodes by configuring
the node size and scale it out by configuring the number of nodes in the VMs cluster.
With Azure-SSIS IR, you can easily run the SSIS packages that are deployed into the SSIS catalog database, hosted in
an Azure SQL Database server or an Azure SQL Database Managed Instance using the Project deployment model, or run
the packages that are deployed into the file system, Azure Files, or SQL Server MSDB database that is hosted in an
Azure SQL Database Managed Instance using the Package Deployment model.
In order to configure the Azure SSIS IR, open the Azure Data Factory using the Azure portal, then from the Overview
page select the Author & Monitor option. From the Get Started window, you can configure the
Azure SSIS IR from the Manage tab -> Integration Runtimes -> New Azure SSIS IR, or directly from the
Configure SSIS Integration option, as shown below:
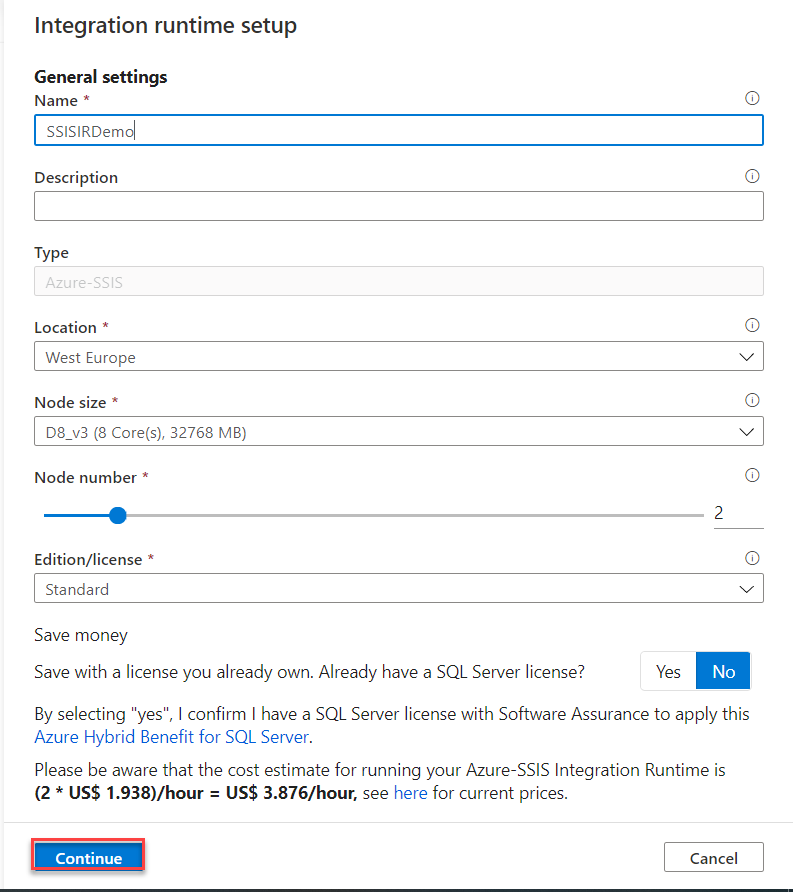
From the General Settings window of the Integration Runtime Setup, provide a meaningful name for the Azure SSIS IR,
the region where this SSIS IR will be hosted, the size of the node in the integration runtime cluster, the number of
nodes that will be assigned to the integration runtime cluster, whether to use Standard or Enterprise SQL Server
edition for the integration runtime and if you plan to use your own SQL Server license to save money, as shown
below:
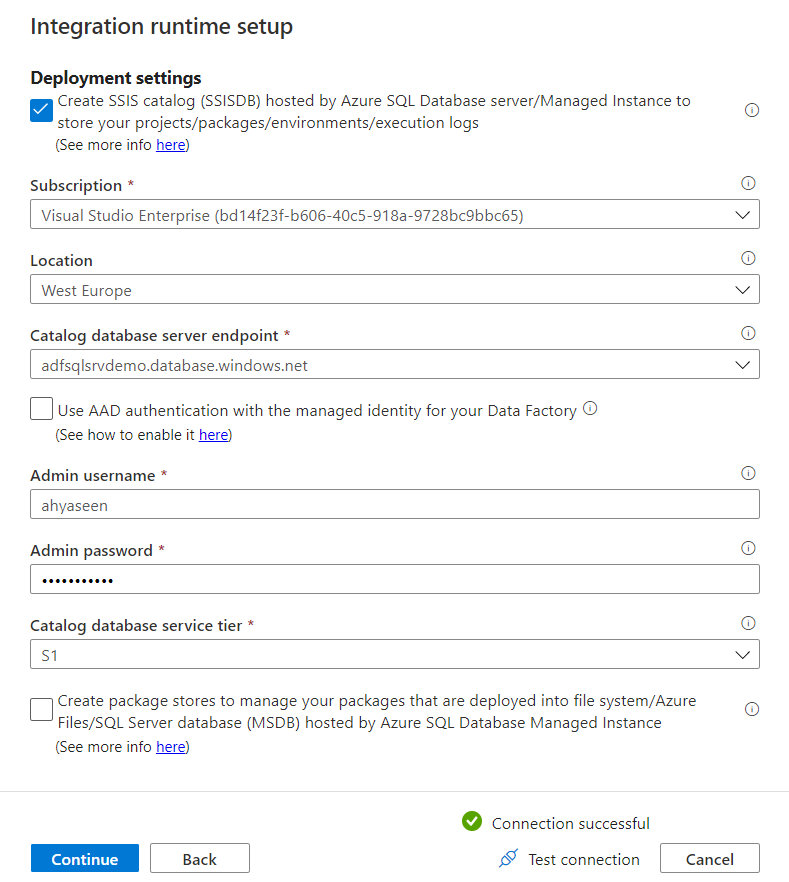
From the Deployment settings window of Integration Runtime Setup, you need to specify whether to create SSISDB and
deploy your packages into it, and/or use Azure-SSIS IR package stores to deploy the SSIS packages.
If you select to create an SSISDB, you will be asked to specify the Azure subscription and the
region where the Azure SQL Server is located, taking into consideration that it is recommended to
have both the Azure SQL Server and the Azure SSIS IR in the same region.
Also, you need to provide the endpoint of the Azure SQL Database server where SSISDB will be created, the SQL
authentication or Azure AD authentication method and credentials that will be used by the Azure Data Factory to
connect to the Azure SQL Server and the service tier for that Azure SQL Database server.
The Azure SSIS IR Package Store option provides you with the ability to manage the SSIS packages that are deployed
into MSDB, file system, or Azure Files.
For the selected Azure SQL Database server, make sure that the Allow access to Azure services
firewall setting is enabled, and that the server does not have an SSISDB instance already created, as using an
existing SSISDB instance is not supported, as shown below:
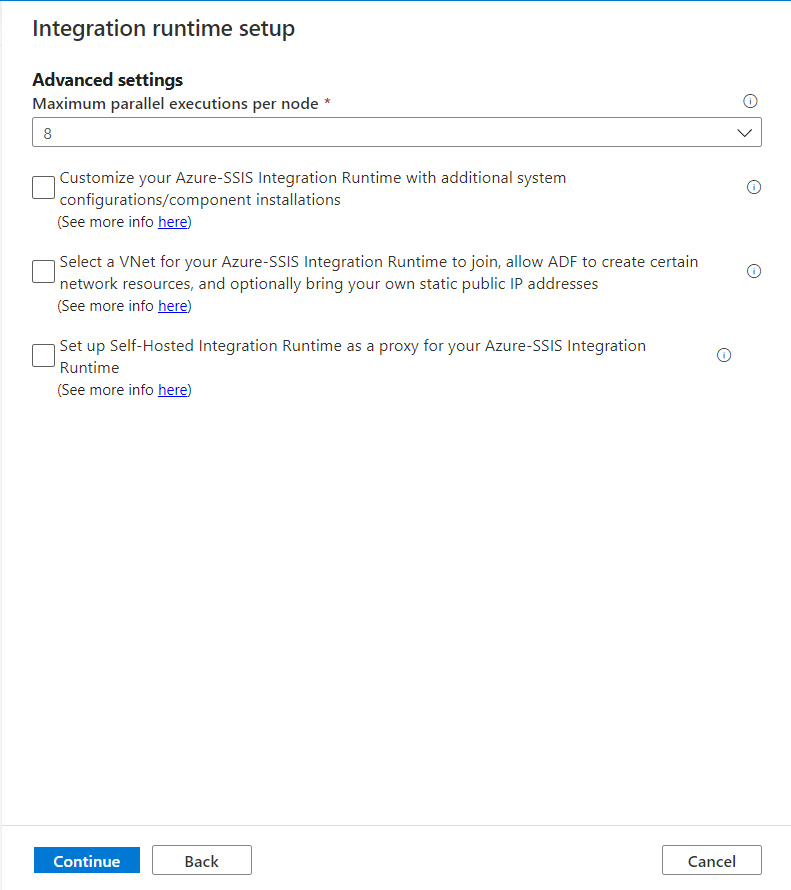
On the Advanced settings window of Integration Runtime Setup, you will be asked to provide the maximum number of
packages that will run concurrently per node in the integration runtime cluster, whether to add standard/express
custom setups on your Azure-SSIS IR, whether to join the Azure SSIS IR to a VNET, and whether to configure a
self-hosted IR as a proxy for the Azure-SSIS IR, as shown below:
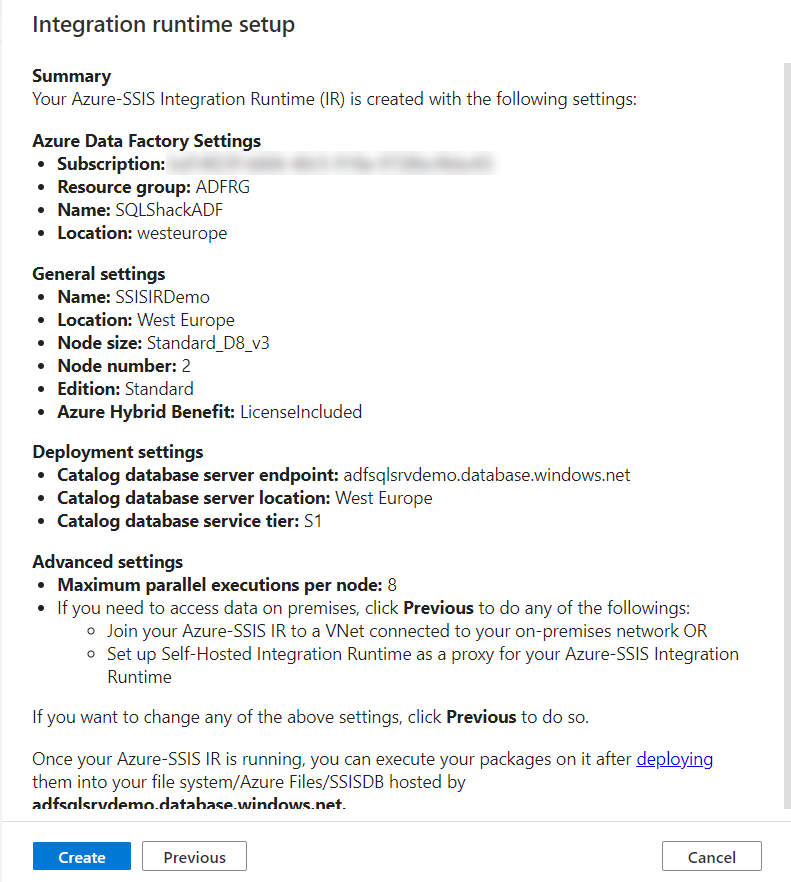
Review all your selections from the Summary page then click Create to proceed:
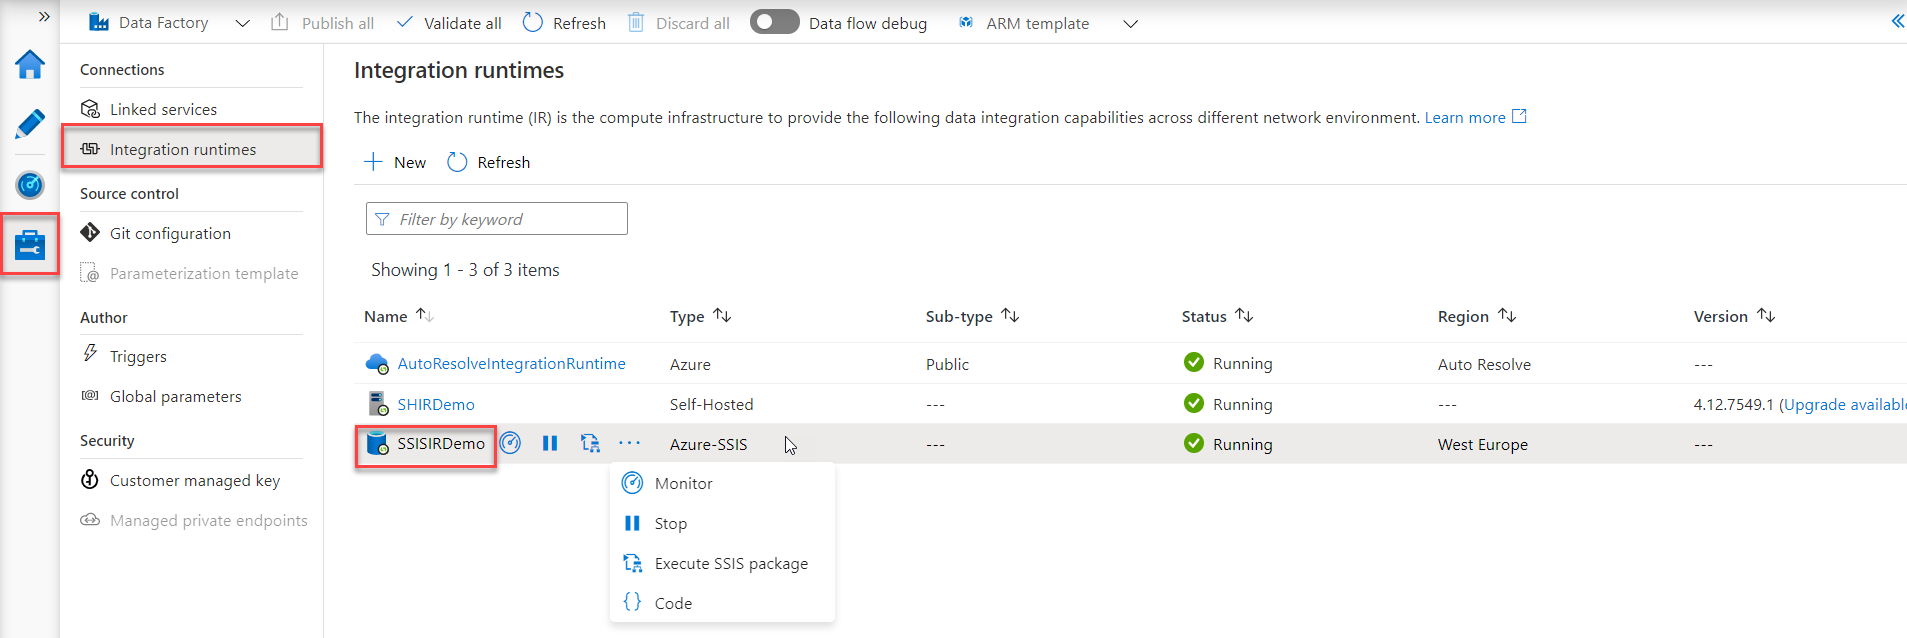
Once created successfully, ensure that the Azure SSIS IR status is changed to “Running” in order to use it to run
the SSIS packages. This can be checked from the automatically opened Manage page, where you can see that the Azure
SSIS IR status is Running, with the ability to edit, monitor, start, stop or delete the Azure-SSIS IR from that
window, taking into consideration that you need to stop it before performing any change. In addition, you can create
a pipeline with Execute SSIS Package activity or view the JSON code of the Azure-SSIS IR from the same page, as
shown below:
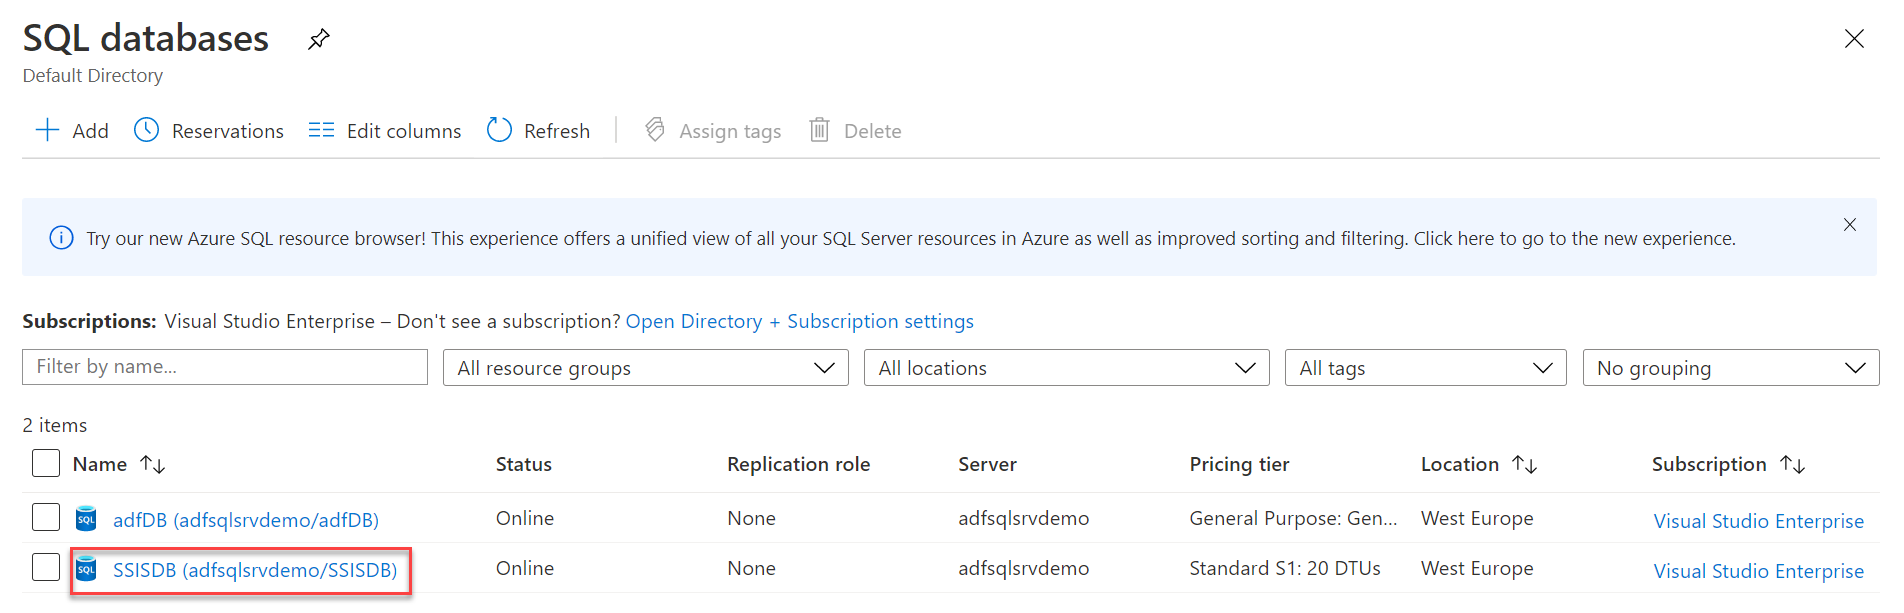
On the other hand, you can verify that the SSISDB instance is created by browsing the databases that are hosted
under the specified Azure SQL Database Server, as below:
Deploying SSIS Packages
Now the Azure-SSIS IR is provisioned and ready for use. The next step is to deploy the SSIS package to the SSISDB in
order to run it under the Azure Data Factory. This can be achieved using the SQL Server Data Tools, SQL Server
Management Studio, and the dtutil and AzureDTExec command-line utilities.
In this demo, we will use the SSDT Integration Service Deployment Wizard that can be run by right-clicking on the
SSIS project name then choose the Deploy option.
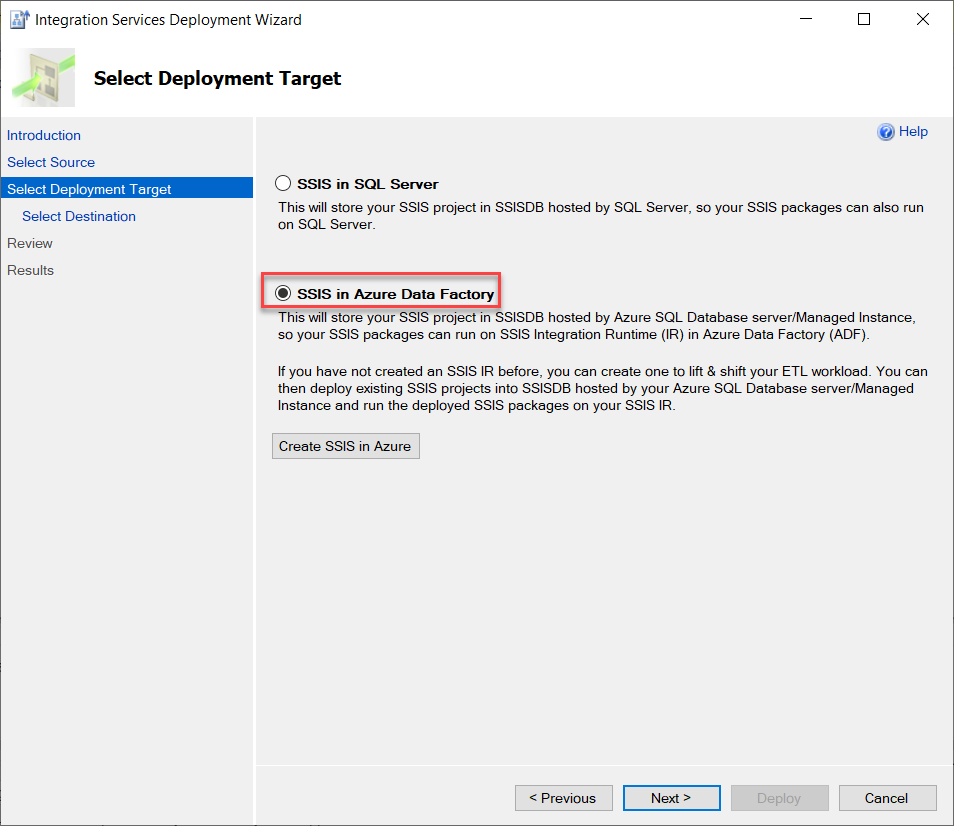
From the Select Deployment Target window of the Integration Service Deployment Wizard, specify if
you will deploy the SSIS package to an SSISDB instance located in an on-premises SQL Server or in an Azure SQL
Database then used by the Azure SSIS IR to be executed under the Azure Data Factory, as shown below:
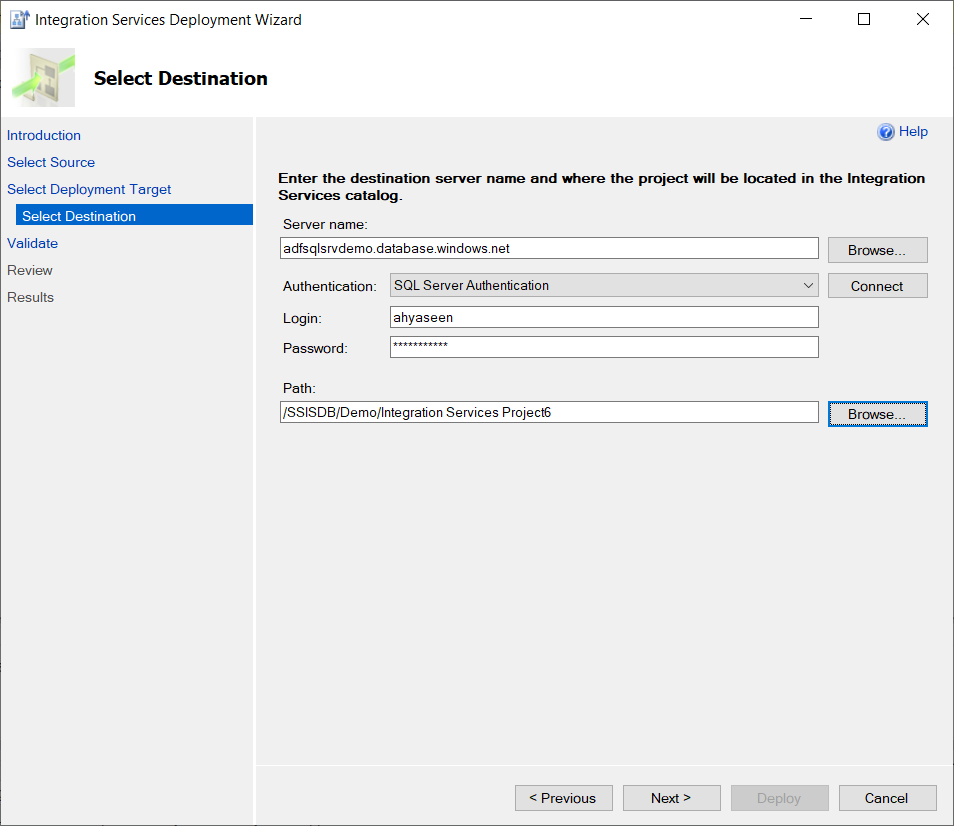
On the Select Destination window of the Integration Service Deployment Wizard, provide the name of
the Azure SQL Database server where the SSISDB is hosted, the credentials that will be used to connect to that
server and the deployment path of the SSIS package within the SSISDB, as shown below:
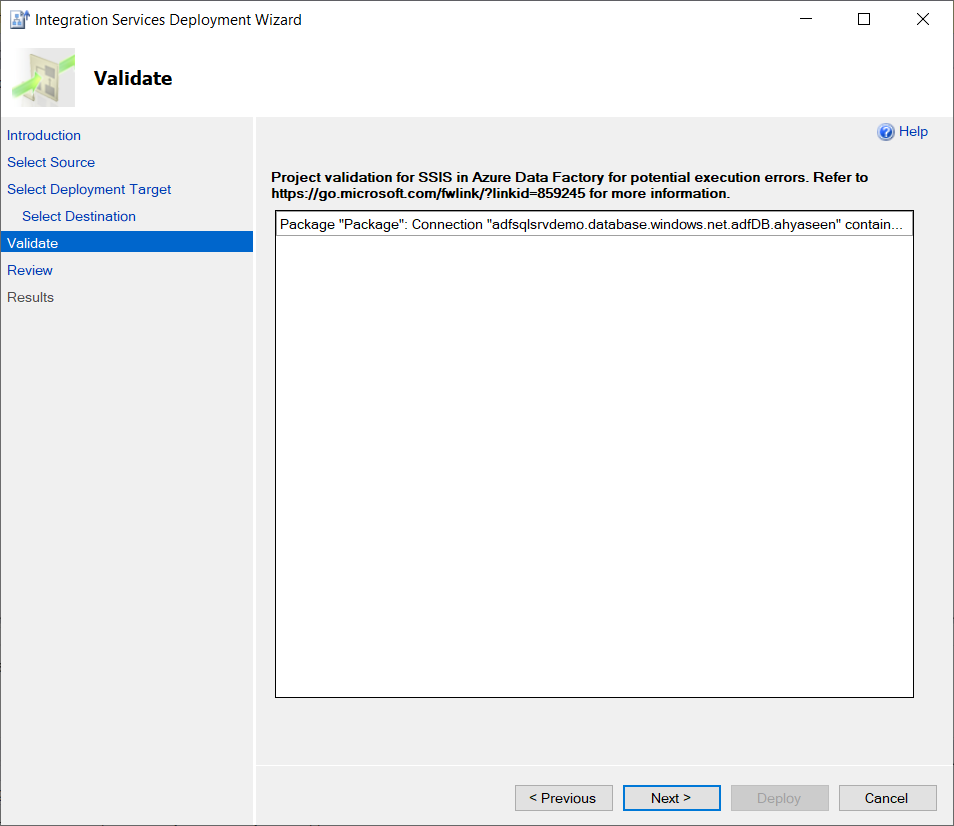
Validating SSIS Packages
After that, the SSIS project will be validated for major execution errors before deploying it to be executed within
the Azure Data Factory. If the validation test goes fine, click Next to proceed or fix any faced
issue in order to deploy the SSIS package, as shown below:
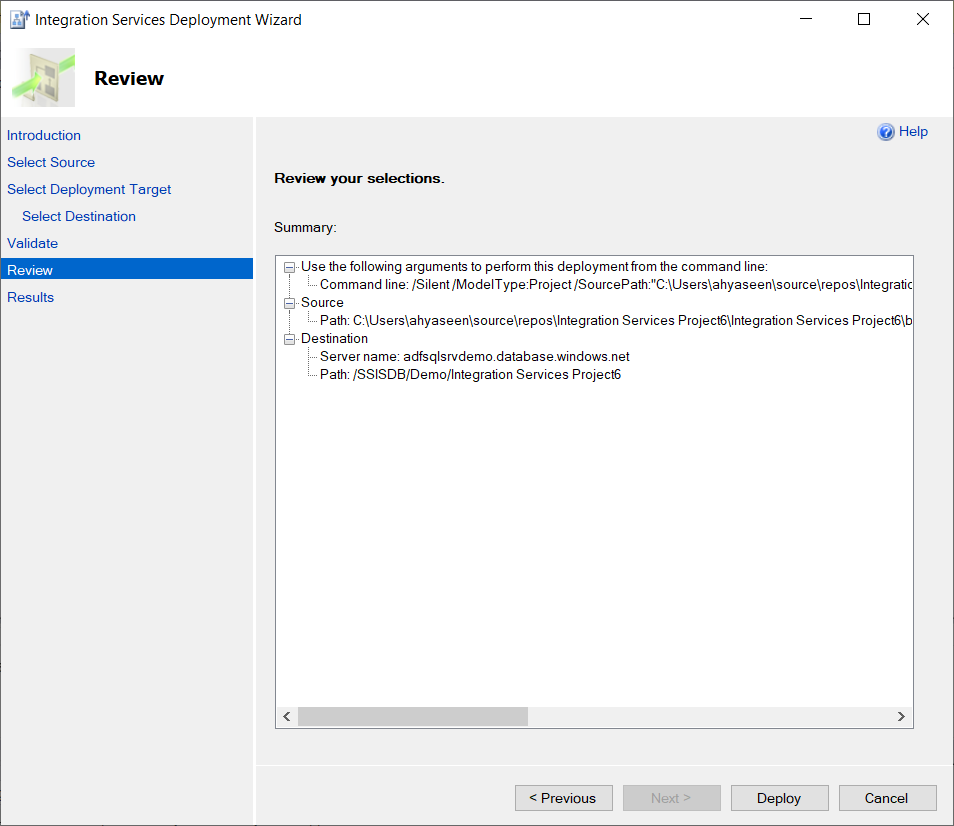
Review all the provided configurations in the Summary window before proceeding, with the ability to go to the
previous steps to fix or change any setting, then click Deploy to proceed:
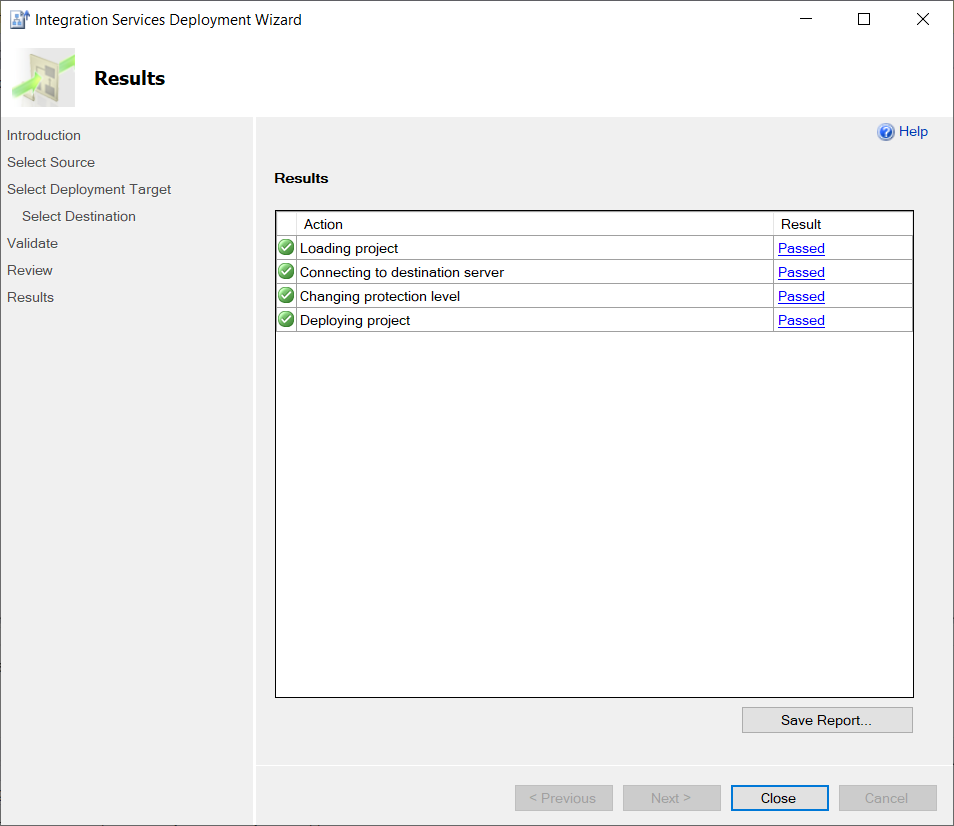
Monitor the deployment step and ensure that the deployment process completed successfully without any issue, taking
into consideration that you should fix any error raised during the deployment process before trying to deploy it
again, then click Close, as shown below:
Run the SSIS Package
After deploying the package to the SSISDB instance that is connected to the Azure SSIS IR, you need to create a new
pipeline to run the SSIS package using an Execute SSIS package activity. To achieve that, you can easily browse the
Manage page of the Azure Data Factory, click on the Integration Runtimes then click on the three dots beside the
Azure SSIS IR and choose the Execute SSIS package option, as shown below:
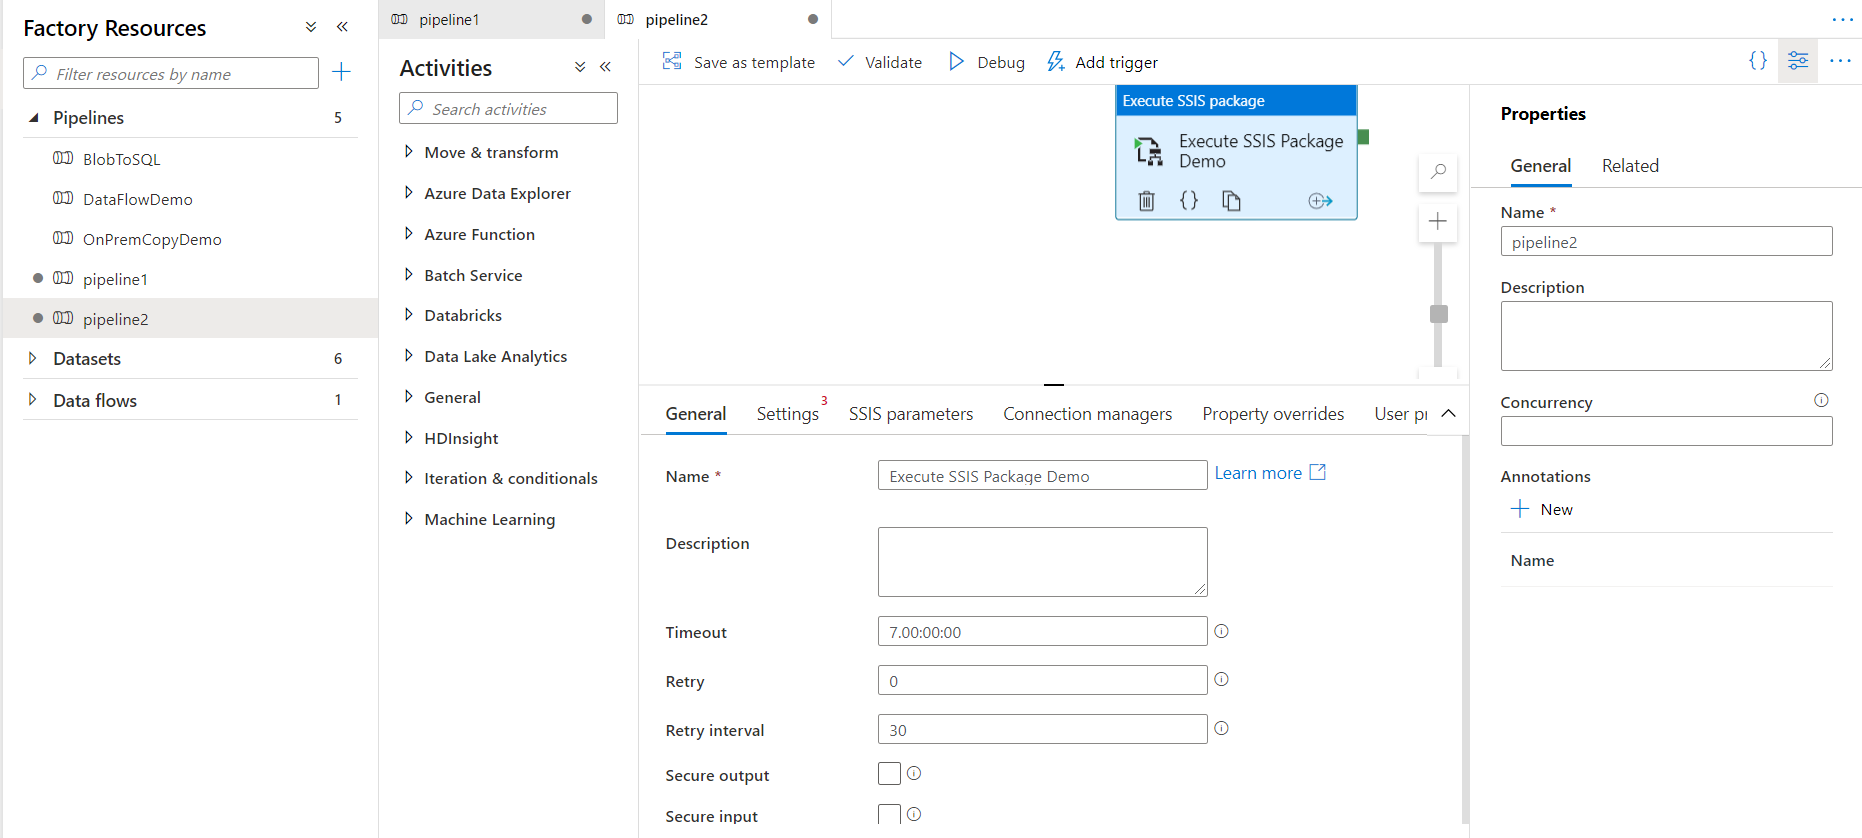
The Execute SSIS package option will automatically create a new pipeline with an Execute SSIS Package activity. In
the General page of the Execute SSIS package activity settings, provide a unique name for the activity, as shown
below:
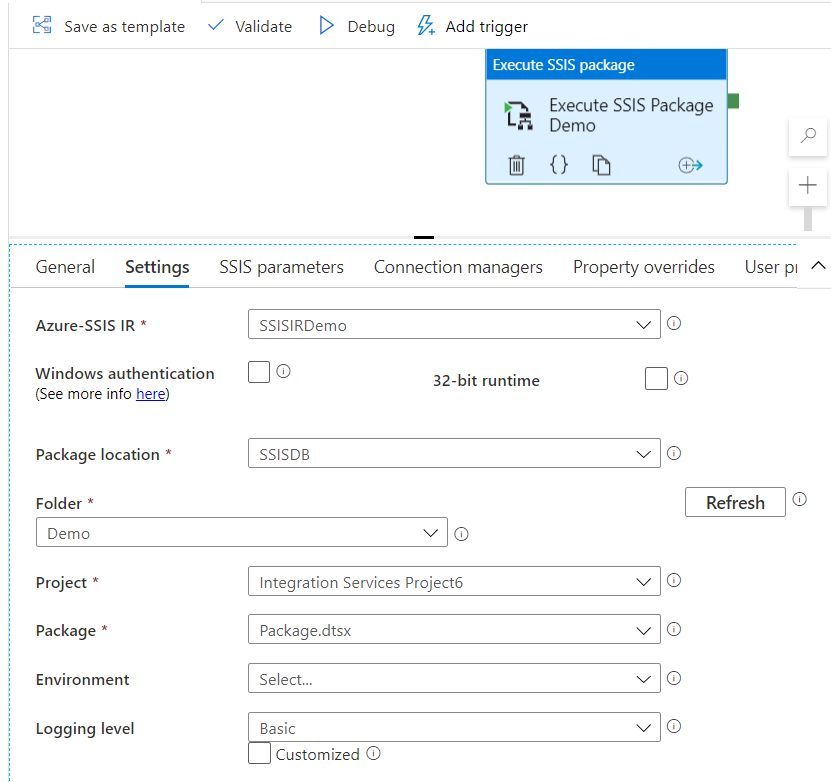
From the Settings page of the Execute SSIS package activity settings, choose the Azure SSIS IR that will be used to
execute the SSIS package under the Azure Data Factory, the location of the SSIS package, the path for the SSIS
package under the specified location and the name of the package to be executed, as shown below:
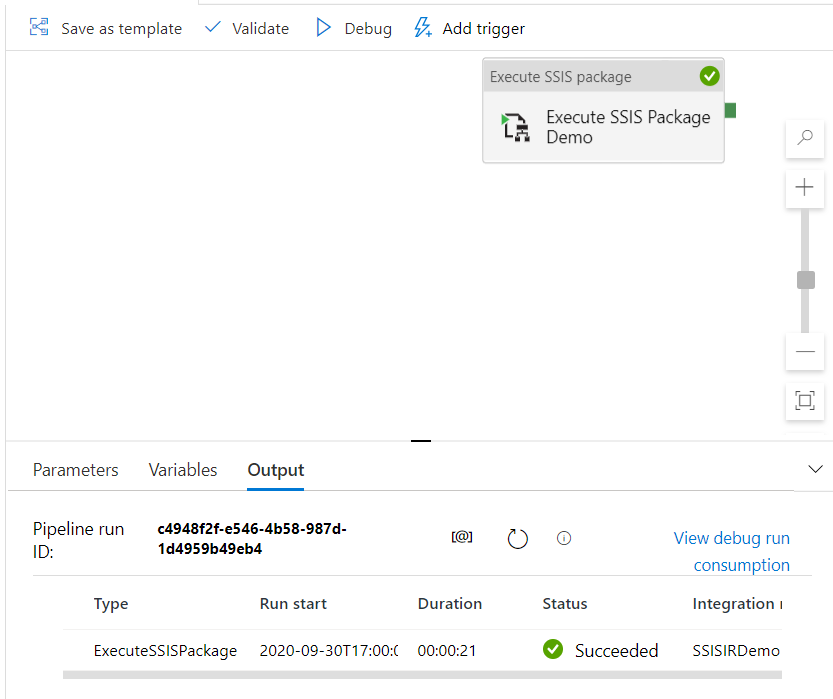
After providing all the required information, validate the pipeline settings then click on the
Debug button to enable the debug mode of the pipeline execution and monitor the SSIS package
execution within the pipeline and ensure that the SSIS package will be executed successfully within the Azure Data
Factory without any error, as shown below:
Now you can easily publish the pipeline to the production Azure Data Factory environment and create a trigger to
schedule the SSIS package execution.
Table of contents
Ahmad Yaseen is a Microsoft Big Data engineer with deep knowledge and experience in SQL BI, SQL Server Database Administration and Development fields.
He is a Microsoft Certified Solution Expert in Data Management and Analytics, Microsoft Certified Solution Associate in SQL Database Administration and Development, Azure Developer Associate and Microsoft Certified Trainer.
Also, he is contributing with his SQL tips in many blogs.