Tweet
Tweet
Share
Share
Big data, labeled data, noisy data. Machine learning projects all need to look at data. Data is
5.2k
By Nick Cotes
Big data, labeled data, noisy data. Machine learning projects all need to look at data. Data is a critical aspect of machine learning projects and how we handle that data is an important consideration for our project. When the amount of data grows and there are need to manage them, allow them to serve multiple projects, or simply need to have a better way to retrieve data, it is natural to consider the use of a database system. It can be a relational database or a flat file format. It can be local or remote.
In this post, we explore different formats and libraries that you can use to store and retrieve your data in Python.
After completing this tutorial, you will learn:
Managing data using SQLite, Python dbm library, Excel and Google Sheets
How to use the data stored externally for training your machine learning model
What are the pros and cons of using a database in a machine learning project
Let’s get started!
Managing Data with Python Photo by Bill Benzon. Some rights reserved.
Overview
This tutorial is divided into seven parts:
Managing data in SQLite
SQLite in action
Managing data in dbm
Using dbm database in machine learning pipeline
Managing data in Excel
Managing data in Google Sheet
Other use of the database
Managing data in SQLite
When we mention database, very often it means a relational database that stores data in a tabular format.
To start off, let’s grab a tabular dataset from sklearn.dataset (to learn more about getting datasets for machine learning, look at our previous article).
The above lines read the “Pima Indians diabetes dataset” from OpenML and create a pandas DataFrame. This is a classification dataset with multiple numerical features and one binary class label. We can explore the DataFrame with
This is not a very large dataset but if it is too large, we may not fit it in memory. Relational database is a tool to help us manage tabular data efficiently without keeping everything in memory. Usually a relational database would understand a dialect of SQL, which is a language to describe operation to the data. SQLite is a serverless database system that do not need any set up and we have built-in library support in Python. In the following we will demonstrate how we can make use of SQLite to manage data but using a different database such as MariaDB or PostgreSQL would be very similar.
Now, let’s start by creating an in-memory database in SQLite and getting a cursor object for us to execute queries to our new database:
import sqlite3
conn=sqlite3.connect(":memory:")
cur=conn.cursor()
If we want to store our data on disk, so that we can reuse it the other time or share with another program, we can store the database in a database file instead by replacing the magic string :memory: in the above code snippet with the filename (e.g., example.db), as such
conn=sqlite3.connect("example.db")
Now, let’s go ahead and create a new table for our diabetes data.
1
2
3
4
5
6
7
8
9
10
11
12
13
14
15
...
create_sql="""
CREATE TABLE diabetes(
preg NUM,
plas NUM,
pres NUM,
skin NUM,
insu NUM,
mass NUM,
pedi NUM,
age NUM,
class TEXT
)
"""
cur.execute(create_sql)
The cur.execute() method executes the SQL query that we have passed into it as an argument. In this case, the SQL query creates the diabetes table with the different columns and their respective datatypes. The language of SQL is not described here but you may learn more from many database books and courses.
Next, we can go ahead and insert data from our diabetes dataset, which is stored in a pandas DataFrame, into our newly created diabetes table in our in-memory SQL database.
# Prepare a parameterized SQL for insert
insert_sql="INSERT INTO diabetes VALUES (?,?,?,?,?,?,?,?,?)"
# execute the SQL multiple times with each element in dataset.to_numpy().tolist()
Let’s break down the above code: dataset.to_numpy().tolist() gives us a list of rows of the data in dataset, which we will pass as an argument into cur.executemany(). Then, cur.executemany() runs the SQL statement multiple times, each time with an element from dataset.to_numpy().tolist(), which is a row of data from dataset. The parameterized SQL expects a list of values each time, and hence we should pass a list of list into executemany(), which is what dataset.to_numpy().tolist() creates.
Now we can check to confirm that all data are stored in the database:
1
2
3
4
5
6
7
8
9
10
11
12
13
14
15
16
import pandas aspd
def cursor2dataframe(cur):
"""Read the column header from the cursor and then the rows of
data from it. Afterwards, create a DataFrame"""
header=[x[0]forxincur.description]
# gets data from the last executed SQL query
data=cur.fetchall()
# convert the data into a pandas DataFrame
returnpd.DataFrame(data,columns=header)
# get 5 random rows from the diabetes table
select_sql="SELECT * FROM diabetes ORDER BY random() LIMIT 5"
cur.execute(select_sql)
sample=cursor2dataframe(cur)
print(sample)
In the above, we use the SELECT statement in SQL to query the table diabetes for 5 random rows. The result will be returned as a list of tuples (one tuple for each row). Then we convert the list of tuples into a pandas DataFrame by associating a name to each column. Running the above code snippet, we get this output.
preg plas pres skin insu mass pedi age class
0 2 90 68 42 0 38.2 0.503 27 tested_positive
1 9 124 70 33 402 35.4 0.282 34 tested_negative
2 7 160 54 32 175 30.5 0.588 39 tested_positive
3 7 105 0 0 0 0.0 0.305 24 tested_negative
4 1 107 68 19 0 26.5 0.165 24 tested_negative
Here’s the complete code for creating, inserting, and retrieving a sample from a relational database for the diabetes dataset using sqlite3:
# Insert data into the table using a parameterized SQL
insert_sql="INSERT INTO diabetes VALUES (?,?,?,?,?,?,?,?,?)"
rows=dataset.to_numpy().tolist()
cur.executemany(insert_sql,rows)
def cursor2dataframe(cur):
"""Read the column header from the cursor and then the rows of
data from it. Afterwards, create a DataFrame"""
header=[x[0]forxincur.description]
# gets data from the last executed SQL query
data=cur.fetchall()
# convert the data into a pandas DataFrame
returnpd.DataFrame(data,columns=header)
# get 5 random rows from the diabetes table
select_sql="SELECT * FROM diabetes ORDER BY random() LIMIT 5"
cur.execute(select_sql)
sample=cursor2dataframe(cur)
print("Data from SQLite database:")
print(sample)
# close database connection
conn.commit()
conn.close()
The benefit of using a database is pronounced when the dataset is not obtained from the Internet but collected by you over time. For example, you may be collecting data from sensors over many days. You may write the data you collected each hour into the database using an automated job. Then your machine learning project can run using the dataset from the database and you may see a different result as your data accumulates.
Let’s see how we can build our relational database into our machine learning pipeline!
SQLite in action
Now that we’ve explored how to store and retrieve data from a relational database using sqlite3, we might be interested in how to integrate it into our machine learning pipeline.
Usually in this situation, we will have a process to collect the data and write to database (e.g., read from sensors over many days). This will be similar to the code in the previous section except we would prefer to write the database into disk for persistent storage. Then we will read from the database in the machine learning process, either for training or for prediction. Depends on the model, there are different ways to use the data. Let’s consider a binary classification model in Keras for the diabetes dataset. We may build a generator to read a random batch of data from the database:
This above code is a generator function that gets batch_size number of rows from the SQLite database and return them as a NumPy array. We may use data from this generator for training in our classification network:
Note that in the generator function, we read only the batch but not everything. We rely on the database to provide us the data and we do not concern how large the dataset is in the database. Although SQLite is not a client-server database system and hence it is not scalable to networks, there are other database systems can do that. Hence you can imagine an extraordinarily large dataset can be used while only limited amount of memory are provided for our machine learning application.
The following are the full code, from preparing the database, to training a Keras model using data read in realtime from it:
1
2
3
4
5
6
7
8
9
10
11
12
13
14
15
16
17
18
19
20
21
22
23
24
25
26
27
28
29
30
31
32
33
34
35
36
37
38
39
40
41
42
43
44
45
46
47
48
49
50
51
52
53
54
55
56
57
58
59
60
61
62
63
64
65
66
67
68
import sqlite3
import numpy asnp
from sklearn.datasets import fetch_openml
from tensorflow.keras.models import Sequential
from tensorflow.keras.layers import Dense
# Create database
conn=sqlite3.connect("diabetes.db")
cur=conn.cursor()
cur.execute("DROP TABLE IF EXISTS diabetes")
create_sql="""
CREATE TABLE diabetes(
preg NUM,
plas NUM,
pres NUM,
skin NUM,
insu NUM,
mass NUM,
pedi NUM,
age NUM,
class TEXT
)
"""
cur.execute(create_sql)
# Read data from OpenML, insert data into the table using a parameterized SQL
Before we move on to next section, we should emphasize that all database is a bit different. The SQL statement we use may not be optimal in other database implementation. Also note that SQLite is not very advanced as its objective is to be a database that requires no server set up. Using a large scale database and how to optimize the usage is a big topic, but the concept demonstrated here should still apply.
Managing data in dbm
Relational database is great for tabular data, but not all dataset are in tabular structure. Sometimes, data are best stored in a structure like Python’s dictionary, namely, a key-value store. There are many key-value data store. MongoDB is probably the most well-known one and it needs a server deployment just like PostgreSQL. GNU dbm is a serverless store just like SQLite and it is installed in almost every Linux system. In Python’s standard library, we have the dbm module to work with it.
Let’s explore Python’s dbm library. This library supports two different dbm implementation, the GNU dbm or ndbm. If neither is installed in the system, there is a Python’s own implementation as fall back. Regardless the underlying dbm implementation, the same syntax is used in our Python program.
This time, we’ll demonstrate using scikit-learn’s digits dataset:
import sklearn.datasets
# get digits dataset (8x8 images of digits)
digits=sklearn.datasets.load_digits()
The dbm library uses a dictionary-like interface to store and retrieve data from a dbm file, mapping keys to values where both keys and values are strings. The code to store the digits dataset in the file digits.dbm is as follows:
import dbm
import pickle
# create file if not exists, otherwise open for read/write
The above code snippet creates a new file digits.dbm if it is not exist yet. Then we pick each digits image (from digits.images) and the label (from digits.target) and create a tuple. We use the offset of the data as key and the pickled string of the tuple as value to store into the database. Unlike Python’s dictionary, dbm allows only string keys and serialized values. Hence we cast the key into string using str(idx) and store only the pickled data.
You may learn more about serialized in our previous article.
The following is how we can read the data back from the database:
1
2
3
4
5
6
7
8
9
10
11
12
13
14
15
16
17
18
19
import random
import numpy asnp
# number of images that we want in our sample
batchsize=4
images=[]
targets=[]
# open the database and read a sample
with dbm.open("digits.dbm","r")asdb:
# get all keys from the database
keys=db.keys()
# randomly samples n keys
forkey inrandom.sample(keys,batchsize):
# go through each key in the random sample
image,target=pickle.loads(db[key])
images.append(image)
targets.append(target)
print(np.asarray(images),np.asarray(targets))
In the above code snippet, we get 4 random keys from the database, then get their corresponding values and deserialize using pickle.loads(). As we know the deserialized data would be a tuple, we assign them into the variables image and target and then collect each of the random sample in the list images and targets. For convenience of training in scikit-learn or Keras, we usually prefer to have the entire batch as a NumPy array.
Running the code above gets us the output:
1
2
3
4
5
6
7
8
9
10
[[[ 0. 0. 1. 9. 14. 11. 1. 0.]
[ 0. 0. 10. 15. 9. 13. 5. 0.]
[ 0. 3. 16. 7. 0. 0. 0. 0.]
[ 0. 5. 16. 16. 16. 10. 0. 0.]
[ 0. 7. 16. 11. 10. 16. 5. 0.]
[ 0. 2. 16. 5. 0. 12. 8. 0.]
[ 0. 0. 10. 15. 13. 16. 5. 0.]
[ 0. 0. 0. 9. 12. 7. 0. 0.]]
...
] [6 8 7 3]
Putting everything together, this is what the code for retrieving the digits dataset, then creating, inserting, and sampling from a dbm database looks like:
1
2
3
4
5
6
7
8
9
10
11
12
13
14
15
16
17
18
19
20
21
22
23
24
25
26
27
28
29
30
31
import dbm
import pickle
import random
import numpy asnp
import sklearn.datasets
# get digits dataset (8x8 images of digits)
digits=sklearn.datasets.load_digits()
# create file if not exists, otherwise open for read/write
Next, let’s look at how to use the our newly created dbm database in our machine learning pipeline!
Using dbm database in machine learning pipeline
At here, probably you realized that we can create a generator and a Keras model for digits classification, just like what we did in the example of SQLite database. Here is how we can modify the code. First is our generator function. We just need to select a random batch of keys in a loop and fetch data from the dbm store:
In more advanced system such as MongoDB or Couchbase, we may simply ask the database system to read random records for us instead of we pick random samples from the list of all keys. But the idea is still the same, we can rely on external store to keep our data and manage our dataset rather than doing in our Python script.
Managing data in Excel
There are times that memory is not the reason we keep our data outside of our machine learning script, but because there are better tools to manipulate the data. Maybe we want to have tools to show us all data on the screen and allow us to scroll, with formatting and highlight, etc. Or maybe we want to share the data with someone else who doesn’t care about our Python program. It is quite common to see people using Excel to manage data in situations where relational database can be used. While Excel can read and export CSV files, chances are that we may want to deal with Excel files directly.
In Python, there are several libraries to handle Excel file and OpenPyXL is one of the most famous. We need to install this library before we can use it:
pip install openpyxl
Excel in the modern days are using the “Open XML Spreadsheet” format with the filename ending in .xlsx. The older Excel file are in a binary format with filename suffix .xls and it is not supported by OpenPyXL (which you can use xlrd and xlwt modules for reading and writing).
Let’s consider the same example as we demonstrated in the case of SQLite above, we can open a new Excel workbook and write our diabetes dataset as a worksheet:
# Create Excel workbook and write data into the default worksheet
wb=openpyxl.Workbook()
sheet=wb.active# use the default worksheet
sheet.title="Diabetes"
forn,colname inenumerate(header):
sheet.cell(row=1,column=1+n,value=colname)
forn,row inenumerate(data):
form,cell inenumerate(row):
sheet.cell(row=2+n,column=1+m,value=cell)
# Save
wb.save("MLM.xlsx")
The code above is to prepare data for each cell in the worksheet (specified by the rows and columns). When we create a new Excel file, there will be one worksheet by default. Then the cells are identified by the row and column offset, begin with 1. We write to a cell with the syntax
sheet.cell(row=3,column=4,value="my data")
and to read from a cell, we use
sheet.cell(row=3,column=4).value
Writing data into Excel cell by cell is tedious and indeed we can add data row by row. The following is how we can modify the code above to operate in rows rather than cells:
# Create Excel workbook and write data into the default worksheet
wb=openpyxl.Workbook()
sheet=wb.create_sheet("Diabetes")# or wb.active for default sheet
sheet.append(header)
forrow indata:
sheet.append(row)
# Save
wb.save("MLM.xlsx")
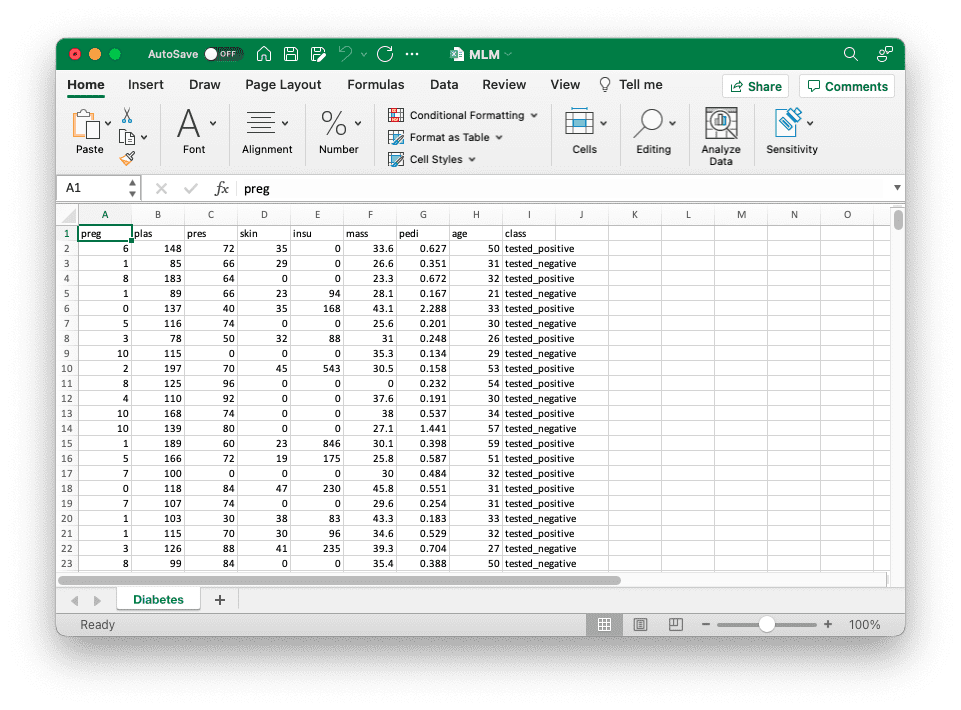
Once we have written our data into the file, we may use Excel to visually browse the data, add formatting, and so on:
To use it for a machine learning project is not any harder than using SQLite database. The following is the same binary classification model in Keras but the generator is reading from the Excel file instead:
In the above, we deliberately give argument steps_per_epoch=20 to the fit() function because the code above will be extremely slow. This is because OpenPyXL is implemented in Python to maximize compatibility but traded off the speed that a compiled module can provide. Hence we better avoid reading data row by row every time from Excel. If we need to use Excel, a better option is to read the entire data into memory in one shot and use it directly afterwards:
Besides Excel workbook, sometimes we may find Google Sheet more convenient to handle data because it is “on the cloud”. We may also manage data using Google Sheet in the similar logic as Excel. But to begin, we need to install some modules before we can access it in Python:
Assume you have a GMail account and you created a Google Sheet. The URL you saw on the address bar, right before the /edit part, tells you the ID of the sheet and we will use this ID later:
To access this sheet from a Python program, it is the best if you create a service account for your code. This is a machine-operable account that authenticates using a key but manageable by the account owner. You can control what this service account can do and when it will expire. You may also revoke the service account at anytime as it is separated from your GMail account.
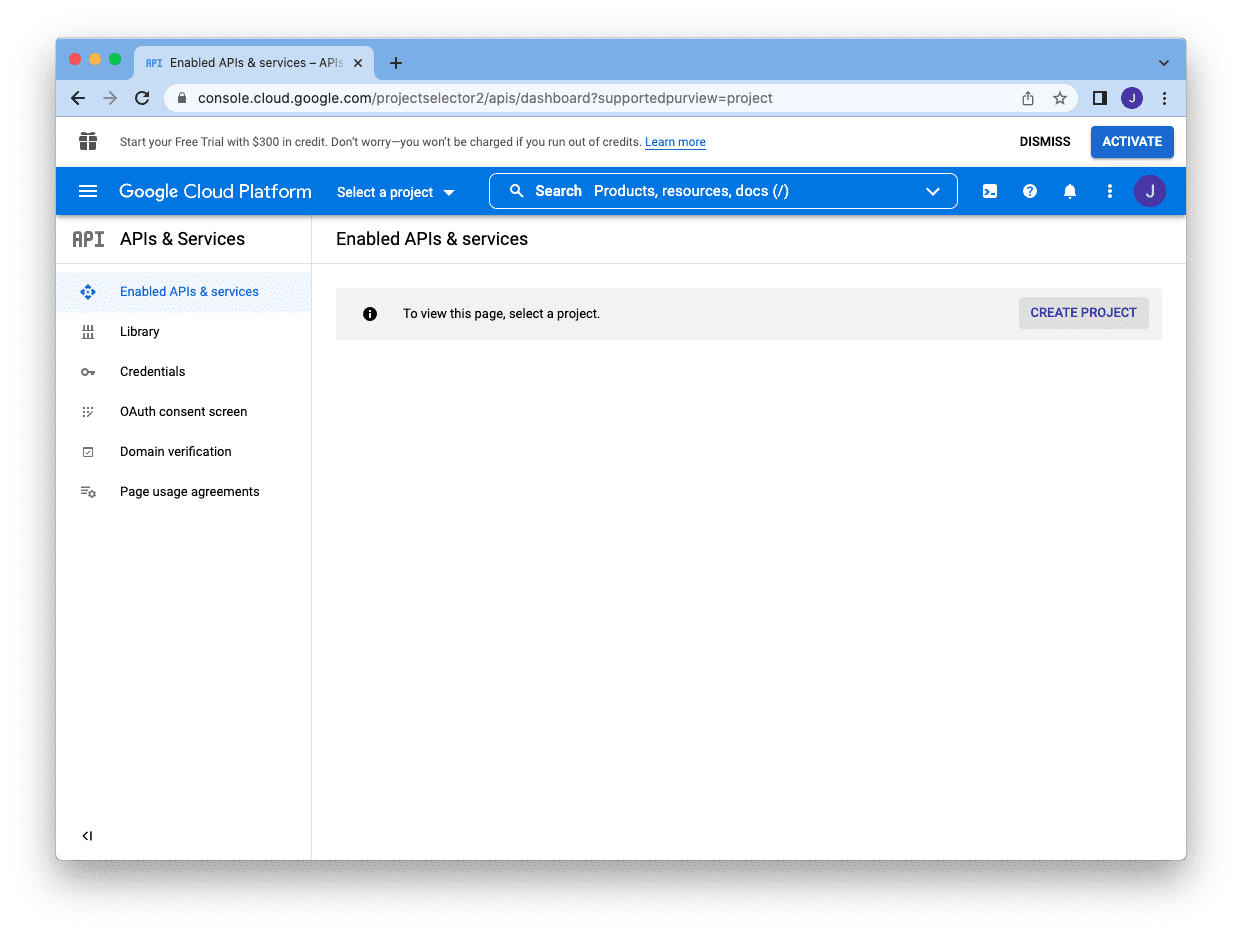
To create a service account, first you need to go to Google developers console, https://console.developers.google.com, and create a project by clicking the “Create Project” button:
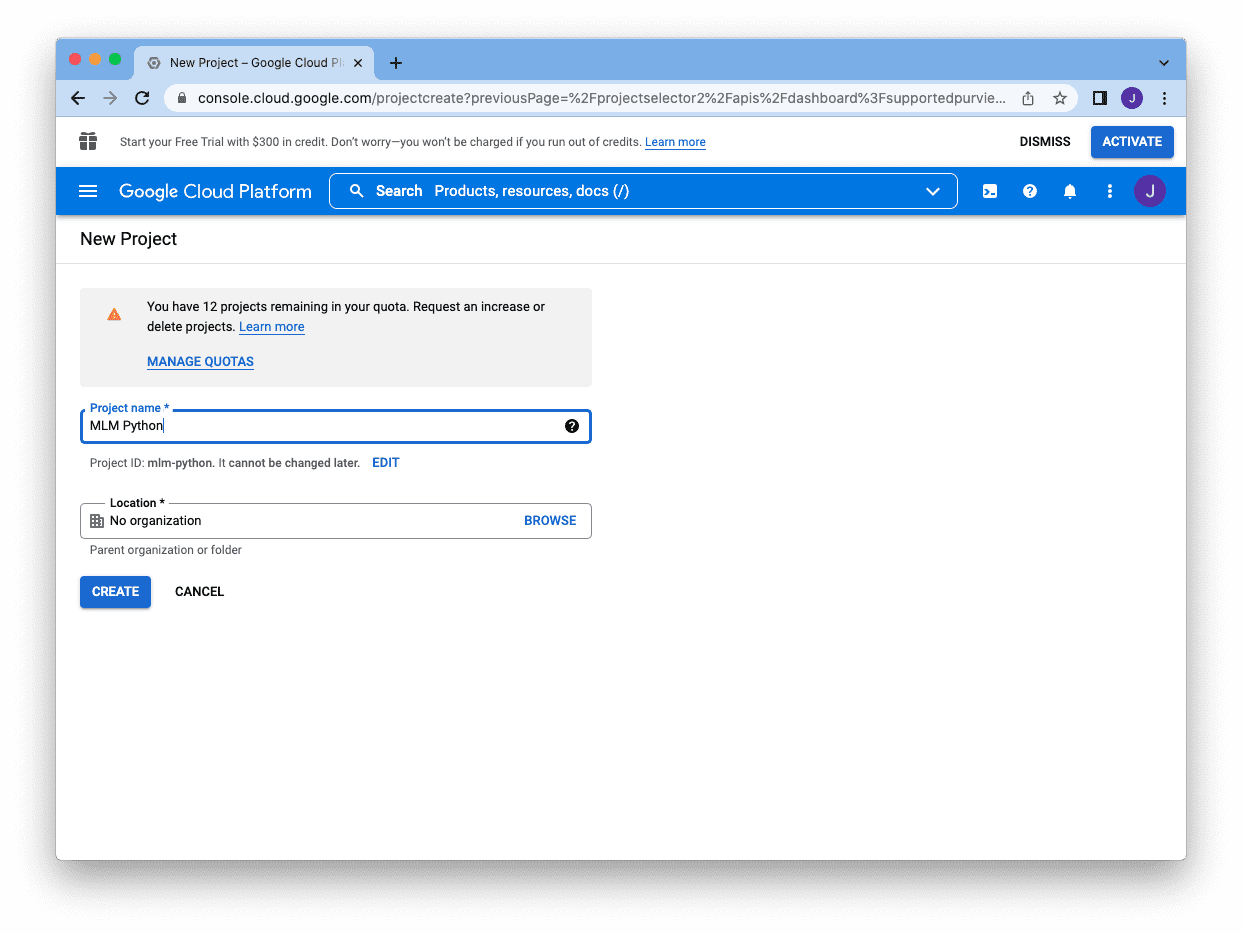
You need to provide a name and then you can click “Create”:
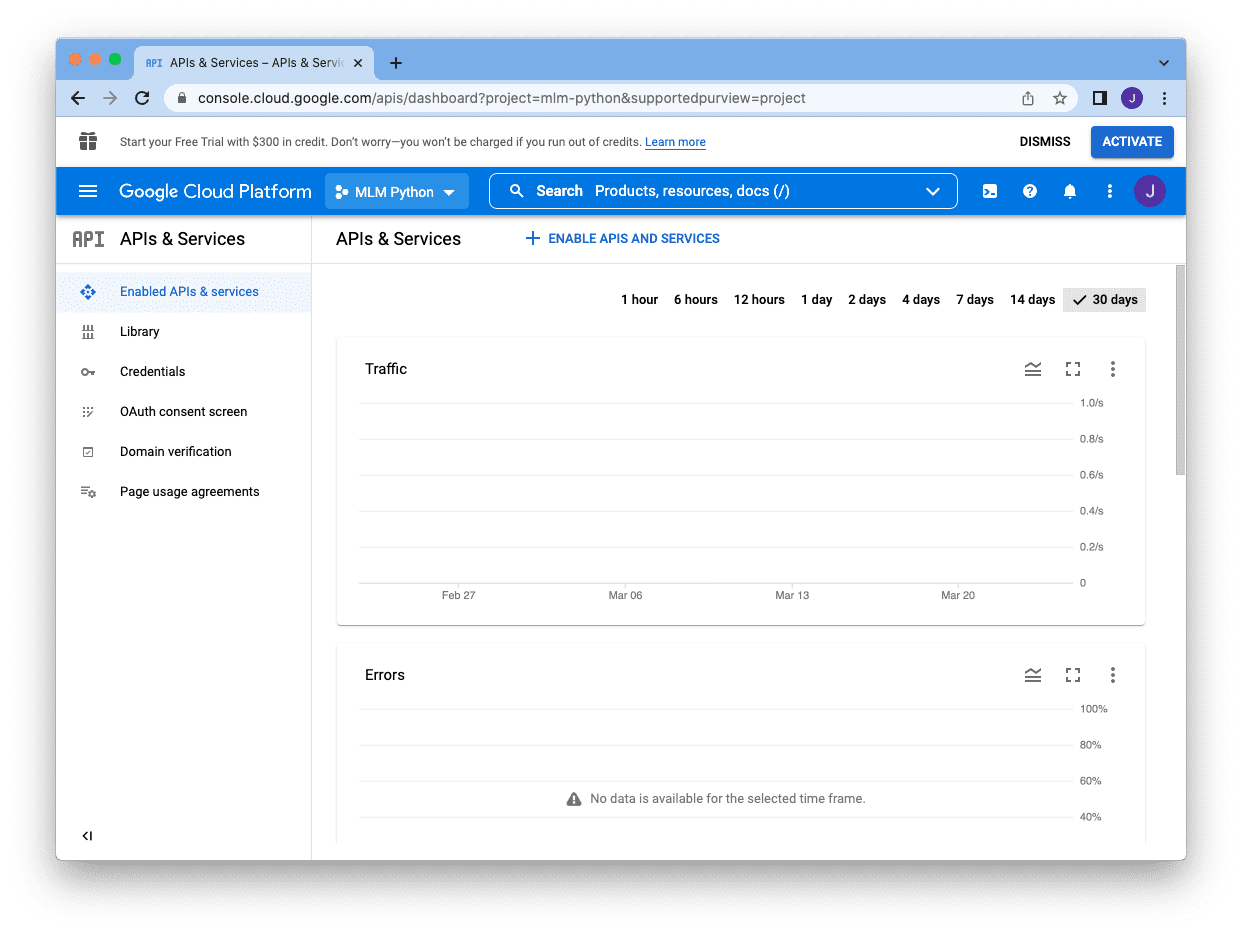
It will bring you back to the console but your project name will appear next to the search box. The next step is to enable the APIs, by clicking “Enable APIs and Services” beneath the search box:
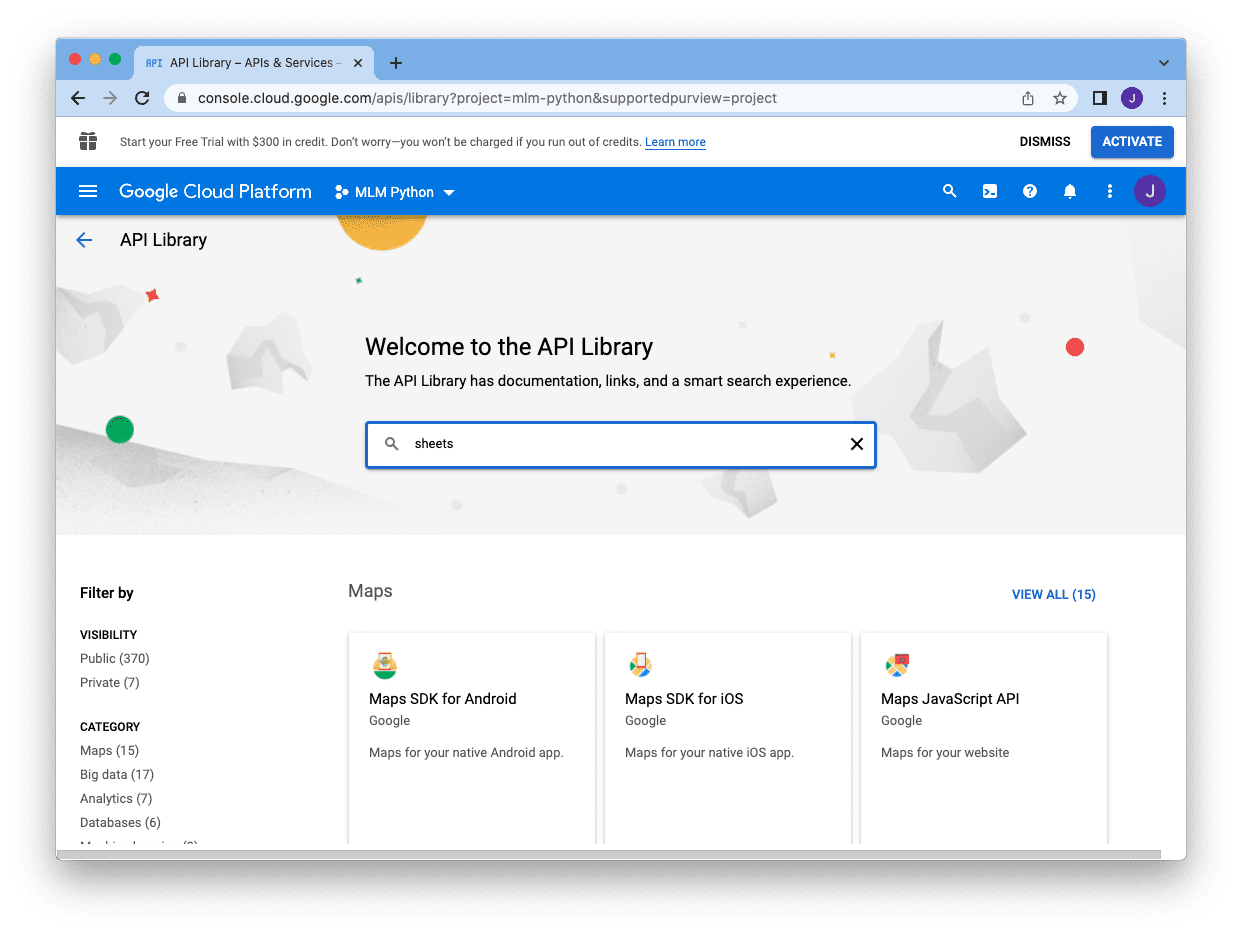
Since we are to create a service account to use Google Sheets, we search for “sheets” on the search box:
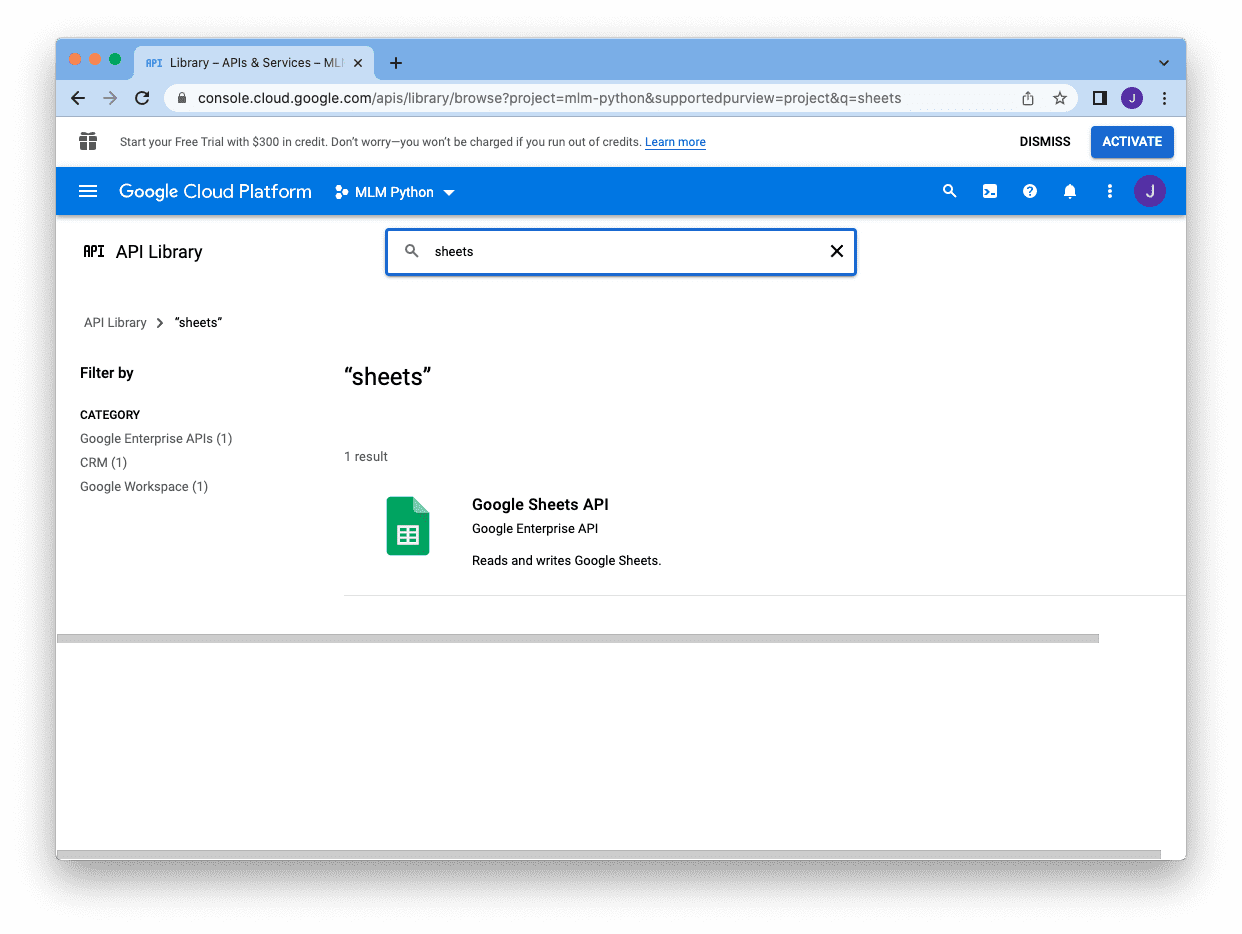
and then click on the Google Sheets API:
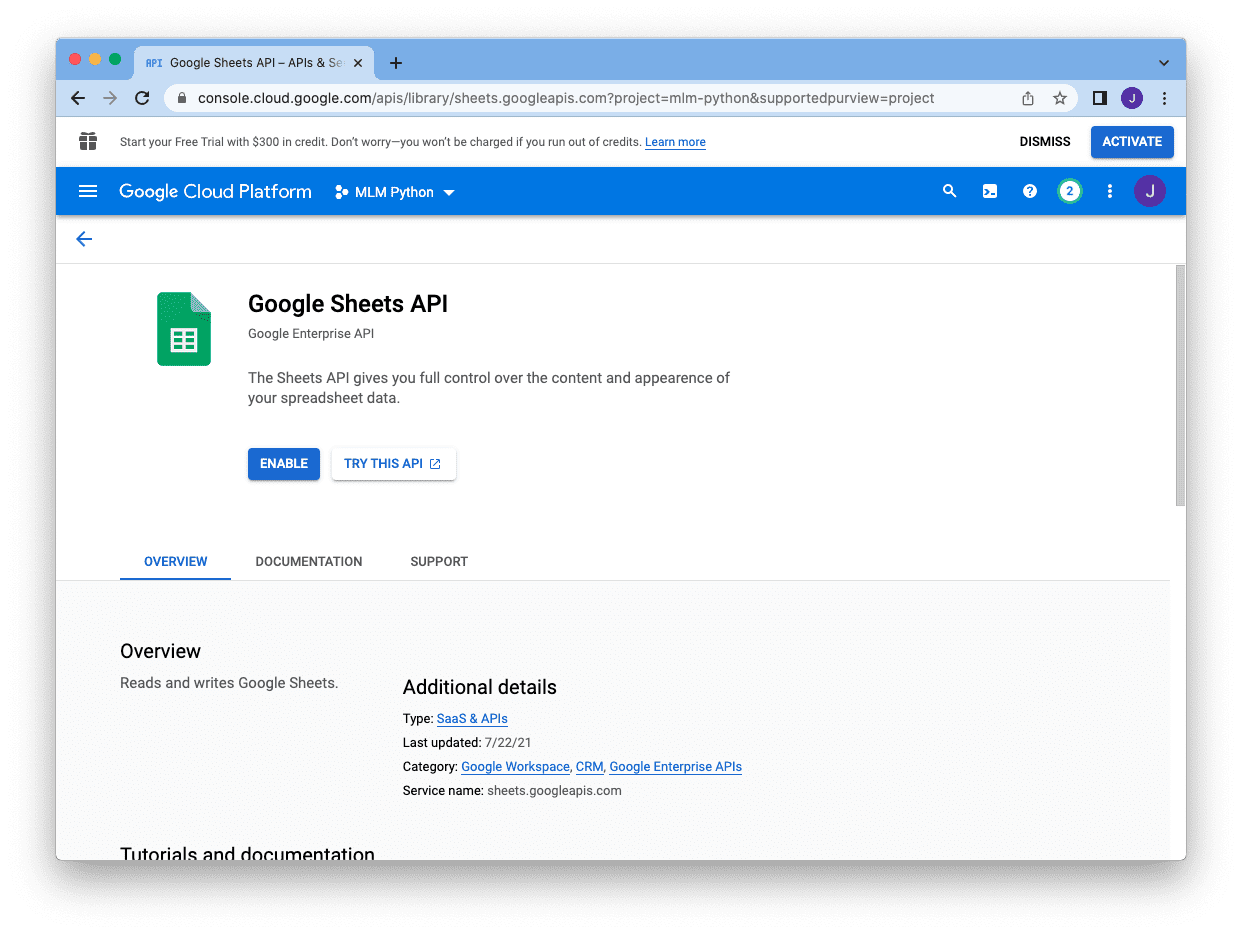
and enable it
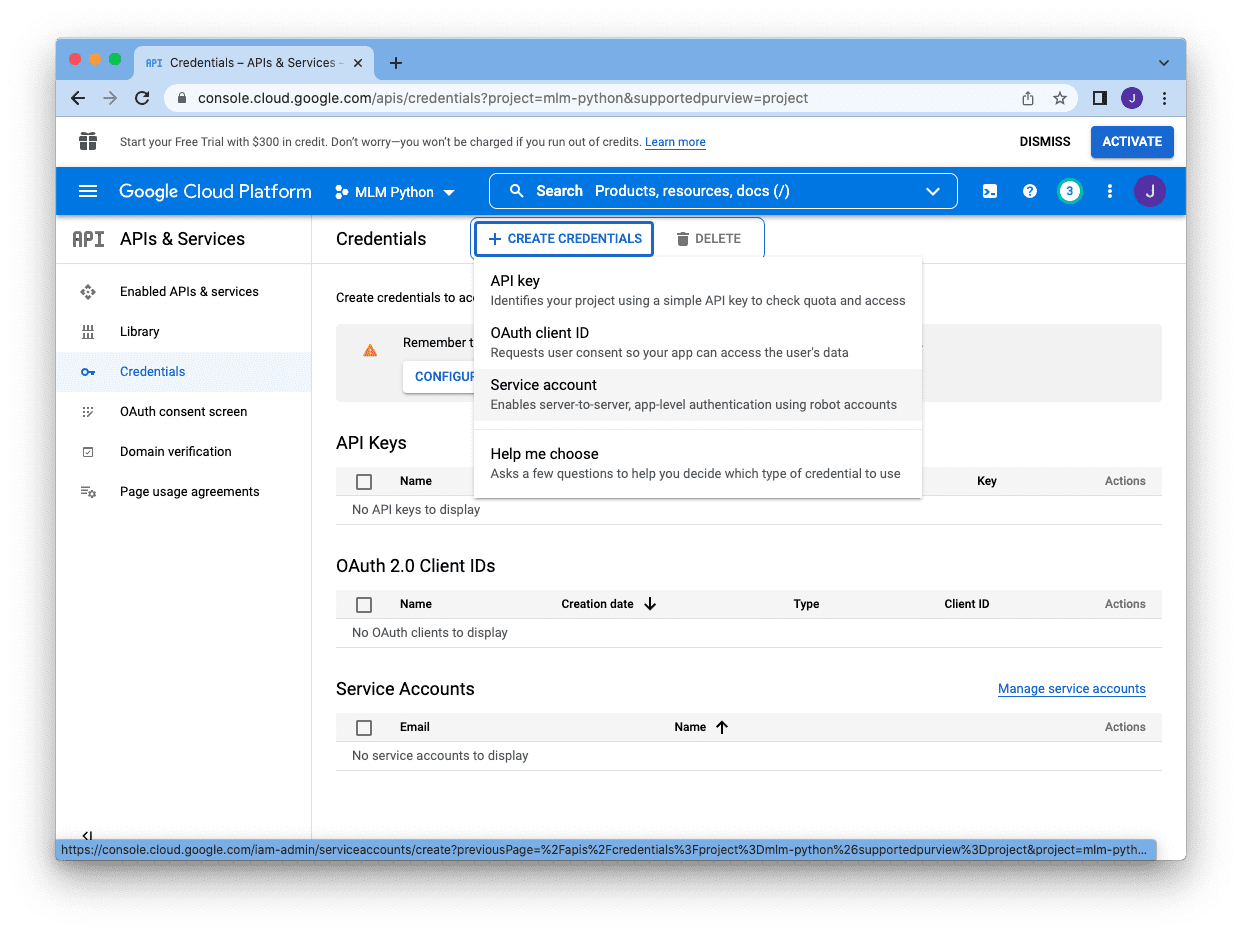
Afterwards, we will be sent back to the console main screen and we can click on “Create Credentials” at the top right corner to create the service account:
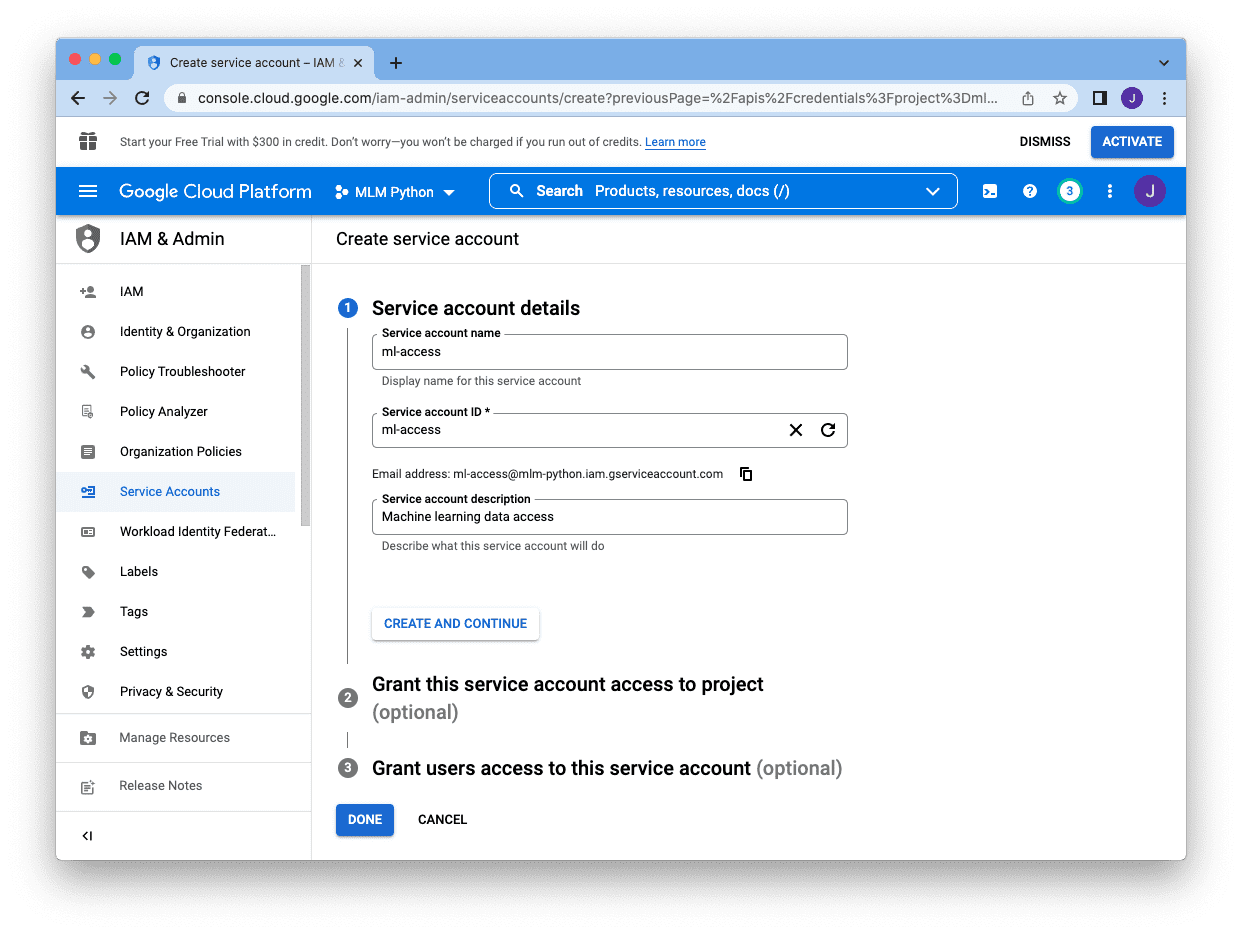
There are different types of credentials, and we select “Service Account”:
and we need to provide a name (for our reference), an account ID (as a unique identifier in the project), and a description. The email address showing beneath the “Service account ID” box is the email for this service account. Copy it and we will add it to our Google Sheet later. After we created all these, we can skip the rest and click “Done”:
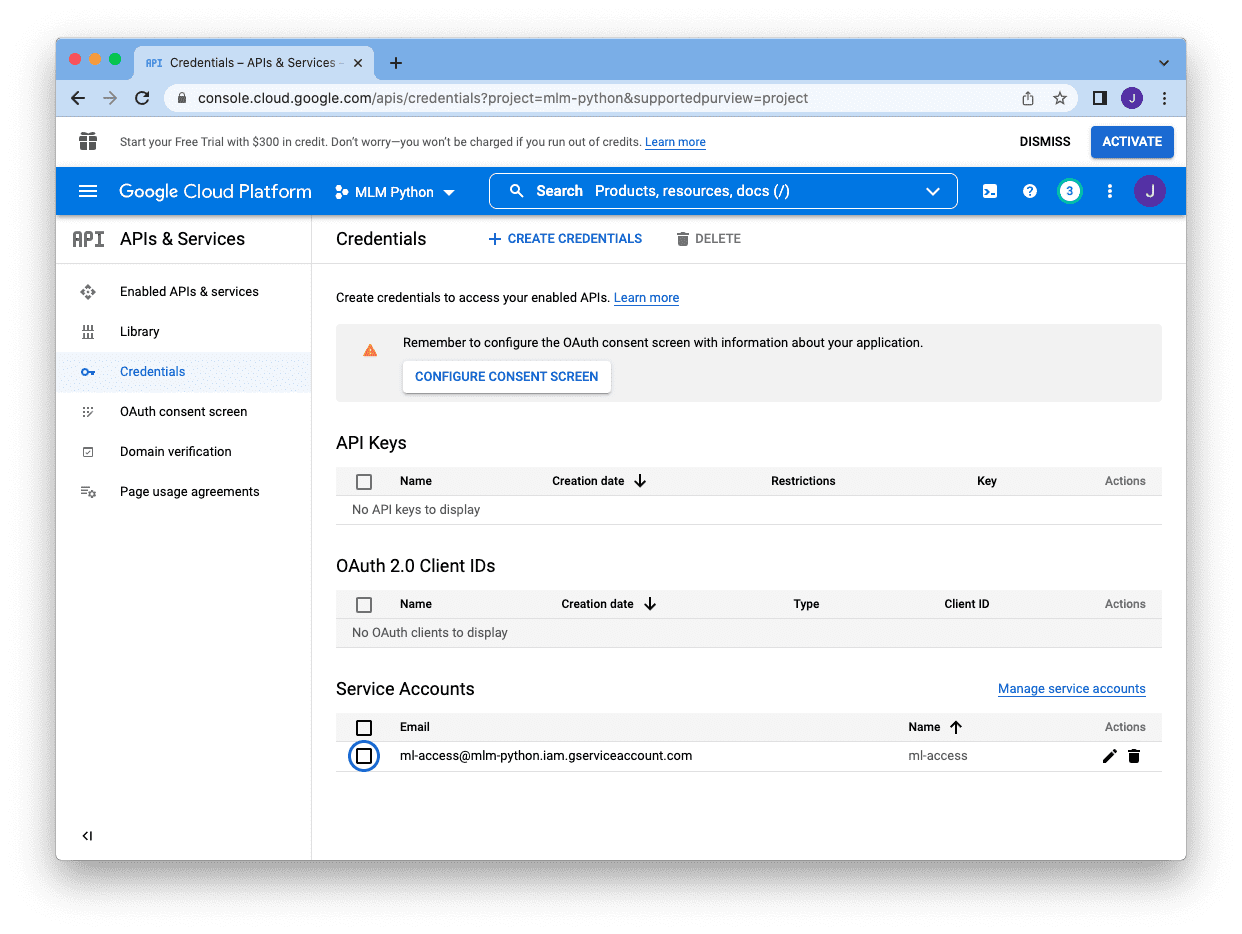
When we finish, we will be sent back to the main console screen and we know the service account is created if we see it under the “Service Account” section:
Next we need to click on the pencil icon at the right of the account, which bring us to the following screen:
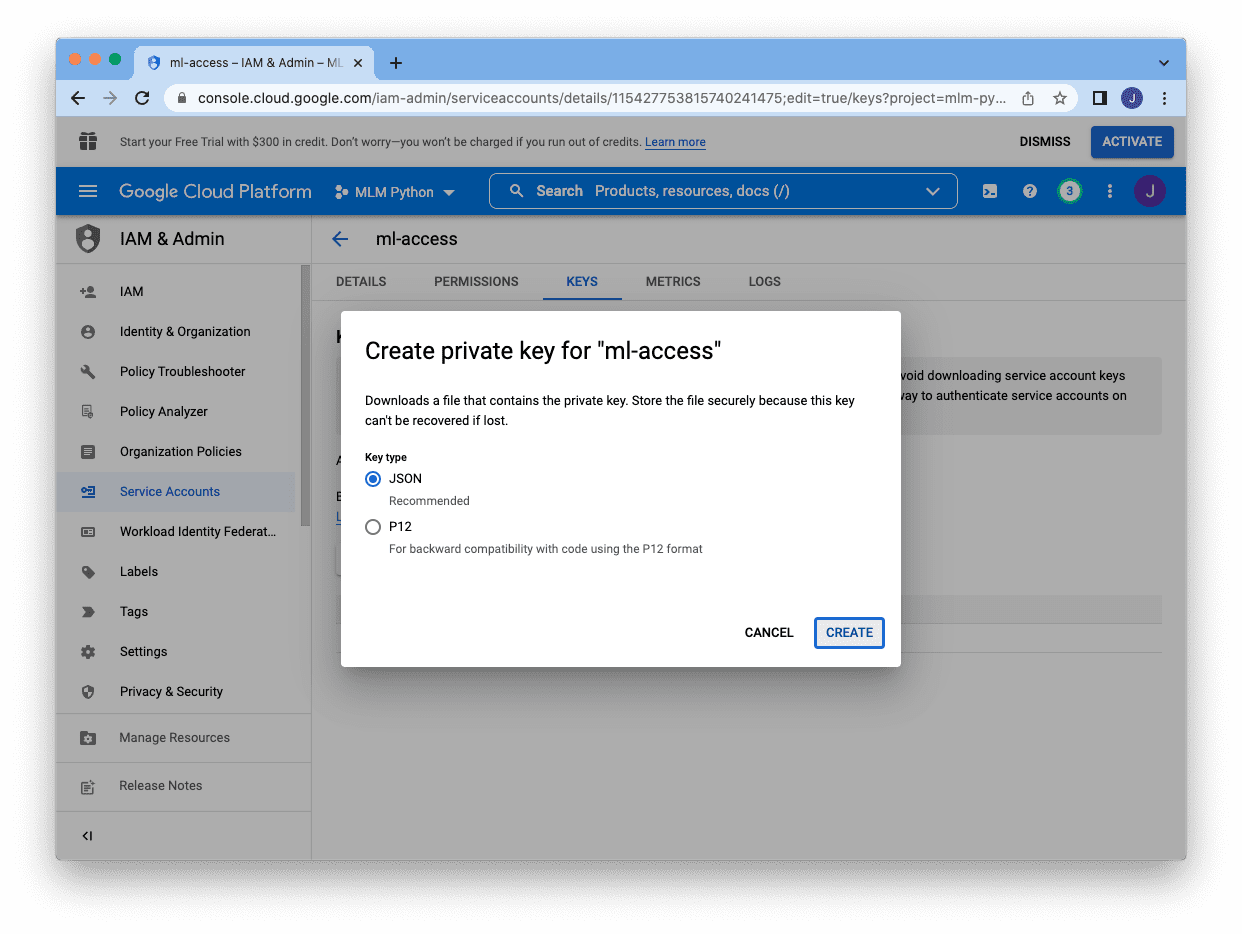
Instead of password, we need to create a key for this account. We click on “Keys” page at top, and then click on “Add Key” and select “Create new key”:
There are two different format for the keys and JSON is the preferred one. Selecting JSON, and click “Create” at the bottom will download the key in a JSON file:
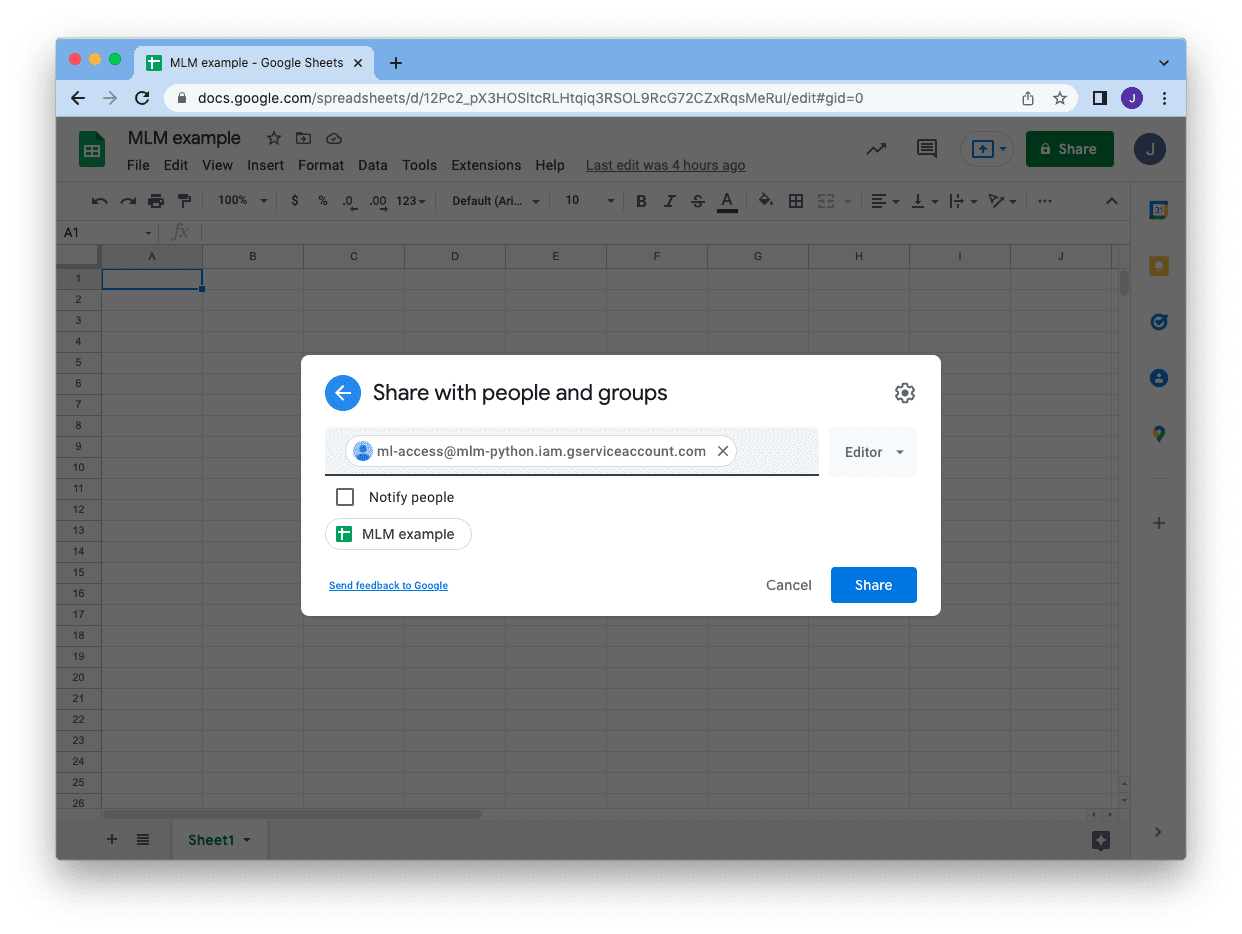
Saving the JSON file, then we can go back to our Google Sheet and share the sheet with our service account. Click on the “Share” button at top right corner and enter the email address of the service account. You can skip the notification and just click “Share”. Then we are all set!
At this point, we are ready to access this particular Google Sheet using the service account from our Python program. To write to a Google Sheet, we can use the Google’s API. We depend on the JSON file we just downloaded for the service account (mlm-python.json in this example) to create a connection first:
from oauth2client.service_account import ServiceAccountCredentials
If we just created it, there should be only one sheet in the file and it has ID 0. All operation using Google’s API is in the form of a JSON format. For example, the following is how we can delete everything on the entire sheet using the connection we just created:
Assume we read the diabetes dataset into a DataFrame as in our first example above, we can write the entire dataset into the Google Sheet in one shot. To do so, we need to create a list of lists to reflect the 2D array structure of the cells on the sheet, then put the data into the API query:
1
2
3
4
5
6
7
8
9
10
11
12
...
rows=[list(dataset.columns)]
rows+=dataset.to_numpy().tolist()
maxcol=max(len(row)forrow inrows)
maxcol=chr(ord("A")-1+maxcol)
action=sheet.values().append(
spreadsheetId=sheet_id,
body={"values":rows},
valueInputOption="RAW",
range="Sheet1!A1:%s"%maxcol
)
action.execute()
In the above, we assumed the sheet has the name “Sheet1” (the default, and as you can see at the bottom of the screen). We will write our data aligned at the top left corner, filling cell A1 (top left corner) onwards. We used dataset.to_numpy().tolist() to collect all data into a list of lists but we also added the column header as the extra row at the beginning.
Reading the data back from the Google Sheet is similar. The following is how we can read a random row of data.
As we have only one sheet, the list contains only one properties dictionary. Using this information, we can select a random row, and specify the range to read. The variable data above will be a dictionary like the following and the data will be in the form of list of lists, and can be accessed using data["values"]:
1
2
3
4
5
6
7
8
9
10
11
{'range': 'Sheet1!A536:I536',
'majorDimension': 'ROWS',
'values': [['1',
'77',
'56',
'30',
'56',
'33.3',
'1.251',
'24',
'tested_negative']]}
Tying all these together, the following is the complete code to load data into Google Sheet and read a random row from it: (be sure to change the sheet_id when you run it)
1
2
3
4
5
6
7
8
9
10
11
12
13
14
15
16
17
18
19
20
21
22
23
24
25
26
27
28
29
30
31
32
33
34
35
36
37
38
39
40
41
42
43
44
45
46
47
48
49
50
51
52
53
54
55
56
57
58
59
import random
from googleapiclient.discovery import build
from httplib2 import Http
from oauth2client.service_account import ServiceAccountCredentials
Undeniably, accessing Google sheet in this way is too verbose. Hence we have a third-party module gspread available to simplify the operation. After we install the module, we can check the size of the spreadsheet as simple as the following:
Similar to the case of reading Excel, to use the dataset stored in a Google Sheet is better to read it in one shot rather than reading row by row during the training loop. This is because every time you read, you are sending a network request and waiting for the reply from Google’ server. This cannot be fast and hence better avoided. The following is an example of how we can combine data from Google Sheet with Keras code for training:
1
2
3
4
5
6
7
8
9
10
11
12
13
14
15
16
17
18
19
20
21
22
23
24
25
26
27
28
29
30
31
32
33
34
35
36
37
38
39
40
41
42
43
44
45
import random
import numpy asnp
import gspread
from sklearn.datasets import fetch_openml
from tensorflow.keras.models import Sequential
from tensorflow.keras.layers import Dense
# Google Sheet ID, as granted access to the service account
The examples above are showing you how to access a database of a spreadsheet. We assume dataset is stored and it is consumed by a machine learning model in training loop. While this is one way of using an external data storage, but not the only way. Some other use case of database would be:
As a storage for logs to keep record of detail of the program, e.g., at what time some script is executed. This is particularly useful to keep track of changes if the script is going to mutate something, e.g., downloading some file and overwriting the old version
As a tool to collect data. Just like we may use GridSearchCV from scikit-learn, very often we would evaluate the model performance with different combination of hyperparameters. If the model is large and complex, we may want to distribute the evaluation to different machines and collect the result. It would be handy if we can add a few lines at the end of the program to write the cross validation result to a database of spreadsheet so we can tabulate the result with the hyperparameters selected. Having these data stored in a structural format allows us to report our conclusion later.
As a tool to configure the model. Instead of writing the hyperparameters combination and the validation score, we can use it as a tool to provide us the hyperparameter selection on running our program. Should we decided to change the parameters, we can simply open up a Google Sheet, for example, to make the change instead of modifying the code.
Further Reading
The following are some resources for you to go deeper:
Books
APIs and Libraries
Articles
Software
Summary
In this tutorial, you how you can use external data storages, including a database or a spreadsheet.
Specifically, you learned:
How you can make your Python program access a relational database such as SQLite using SQL statements
How you can use dbm as a key-value store and use it like a Python dictionary
How to read from Excel files and write to it
How to access Google Sheet over the Internet
How we can use all these to host dataset and use them in our machine learning project