Last update: December 19, 2021 07:40 AM UTC
December 19, 2021
John Ludhi/nbshare.io
Stock Charts Detection Using Image Classification Model ResNet
This tutorial explores image classification in PyTorch using state-of-the-art computer vision models.
The dataset used in this tutorial will have 3 classes that are very imbalanced. So, we will explore augmentation as a solution to the imbalance problem.
Contents:
- Data loading
- Loading labels
- Train-test splitting
- Augmentation
- Creating Datasets
- Random Weighted Sampling and DataLoaders
- CNN building and fine-tuning ResNet
- Setup and training
- Evaluation
- Testing
Setting the device to make use of the GPU.
Identifying the data paths.
Out[5]:
|
Image Name |
Category |
| 0 |
0Ou5bdH5c094eTqk.jpg |
Others |
| 1 |
15i__Nqs70zFkb_h.jpg |
Others |
| 2 |
1B7Kf3yXIchfrliL.jpg |
Others |
| 3 |
1tKvOK_m3ZEInWe1.jpg |
Others |
| 4 |
32d0brxK_-4Ha_Ff.jpg |
Others |
As shown, we have 3 classes that are imbalanced.
Out[6]:
Technical    911
Others       488
News         101
Name: Category, dtype: int64
Creating numerical IDs for each class. The following list and dictionary are used for converting back and forth between labels and IDs.
We use pandas to split the data into an 80-20 split.
Out[10]:
['FFnZNgvXMAgUuS9.jpg',
 'FFiiKZRWQAAsW1X.jpg',
 'FFiLBOtUUAUsHV3.jpg',
 'FFYyzfpVQAIaN7F.png',
 'FFmhojdWUAYRGWT.jpg']
Train set size: 1200
Test set size: 300
The solution we follow in this tutorial for data imbalance is to create a random weighted sampler that, in each batch, takes approximately the same number of images from each class. It does so by using replacement sampling with the inferior classes.
However, that alone is not enough. Since there will be replacement in sampling (meaning that the same image can repear twice in a batch), we need to perform augmentation on all images to add some differences.
This is performed using PyTorch "transforms".
For both training and test sets, we will apply the following transformations to create augmented versions of the images:
Initializing the Datasets
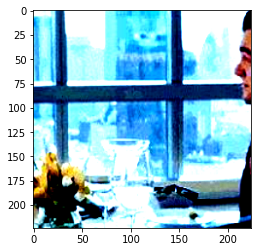
Plotting an image to verify the changes. As shown, the image is cropped into a 224x224 square as intended.
Clipping input data to the valid range for imshow with RGB data ([0..1] for floats or [0..255] for integers).
Out[15]:
<matplotlib.image.AxesImage at 0x7f00326f6b50>
Random Weighted Sampling and DataLoaders
PyTorch provides an implementation for random weighted sampling using this class:
WeightedRandomSampler()
This class takes 2 parameters to create the sampler: the weights of each instance of each class, and the size of the dataset. We calculate the weights and create the sampler using this function:
Finally, we use those samplers while creating the DataLoaders. That way the DataLoaders are ready to provide balanced data.
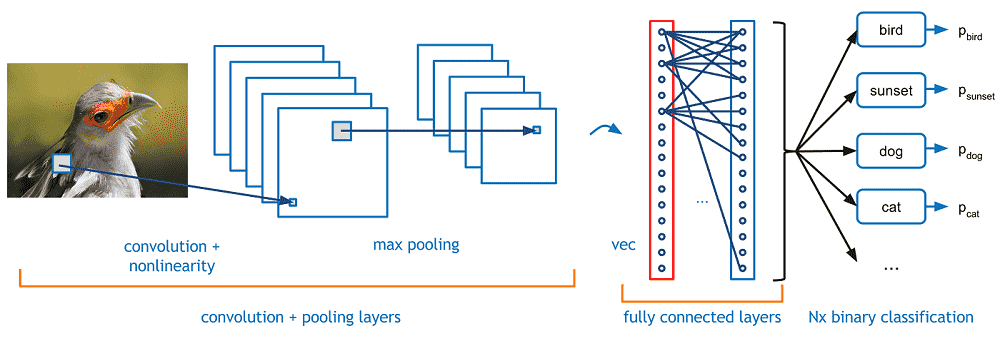
CNN building and fine-tuning ResNet
The following is a simple CNN model. We use ResNet as the main model in this tutorial, but you can use the CNN below instead by initializing the model to CNN().
To choose the CNN, run this cell and not the one below it:
Out[ ]:
CNN(
  (conv1): Conv2d(3, 6, kernel_size=(5, 5), stride=(1, 1))
  (pool): MaxPool2d(kernel_size=2, stride=2, padding=0, dilation=1, ceil_mode=False)
  (conv2): Conv2d(6, 16, kernel_size=(5, 5), stride=(1, 1))
  (fc1): Linear(in_features=44944, out_features=120, bias=True)
  (fc2): Linear(in_features=120, out_features=84, bias=True)
  (fc3): Linear(in_features=84, out_features=10, bias=True)
)
Here, we use ResNet-101 as the model:
Downloading: "https://download.pytorch.org/models/resnet101-63fe2227.pth" to /root/.cache/torch/hub/checkpoints/resnet101-63fe2227.pth
Initializing the criterion and optimizer:
Out[30]:
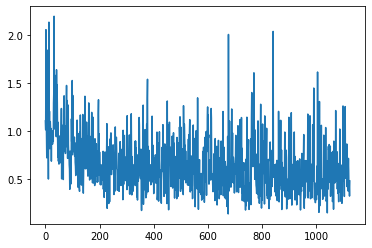
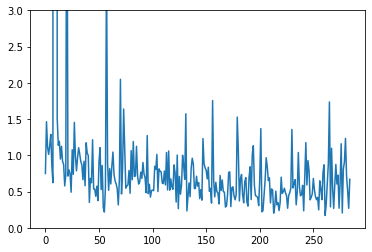
[<matplotlib.lines.Line2D at 0x7f0019ce1090>]
We can observe from the training and the losses that the model learned, although it was noisy.
We find the accuracy by predicting the test set:
/usr/local/lib/python3.7/dist-packages/PIL/Image.py:960: UserWarning: Palette images with Transparency expressed in bytes should be converted to RGBA images
  "Palette images with Transparency expressed in bytes should be "
6
7
8
9
10
11
12
13
14
15
16
17
18
<class 'list'> 300
<class 'list'> 300
Despite using a SOTA model, advanced image processing, and good imbalance solutions, the accuracy of this 3 class task is relatively low. There are 2 main problems we can observe:
There are many incorrect labels in the data. This adds noise in the learning process and confuses the model, preventing it to learn from many instances. The graphs of the loss demonstrate this problem, where the plot increases and decreases sharply. The solution is to recheck the labels.
The 2nd problem I observe is the content of the "Other" class. It is always better to avoid including an "other" class in image classification, or at least to keep the instances in the "other" class relatively similar. The "other" images in the data are very random, making it difficult to detect. The solution is to either try training without this class, or to improve the quality of the images in this class. That way, the model is not very confused about the content of this class.
To further validate the perforamance, we predict the labels for random images in the test set:
Out[38]:
('FFdPSh3XsAImGWs.jpg', 'Others')
Clipping input data to the valid range for imshow with RGB data ([0..1] for floats or [0..255] for integers).
Out[39]:
<matplotlib.image.AxesImage at 0x7f0019a56c90>
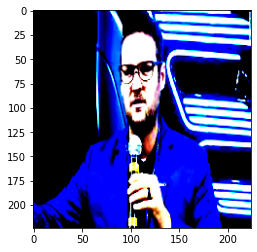
However, the model is correct for the shown example above, as it predicted category "Others" because it is neither News nor stock chart.
December 19, 2021 04:38 AM UTC
December 18, 2021
Sandipan Dey
Environmental (Spatiotemporal) Data Analysis with Gaussian Processes
In this blog, we shall first discuss about how to use simulation techniques and then Gaussian Processes to analyze spatiotemporal data and make predictions. This problem appeared as homework / project in the edX course MITx 6.419x Data Analysis: Statistical Modeling and Computation in Applications, everything about the problem description, statement is taken from the course … Continue reading Environmental (Spatiotemporal) Data Analysis with Gaussian Processes
December 18, 2021 10:32 PM UTC
ItsMyCode
Python String count()
ItsMyCode |
Python String count() method is a built-in function that returns the number of occurrences of a substring in the given string.
count() Syntax
The syntax of count() method is:
string.count(substring, start=..., end=...)
count() Parameter
The count() function can take three parameters, of which two are optional.
- substring – the string that needs to be searched and get the count.
- start (Optional) – The starting index in the string from which the search needs to begin. Default is 0.
- end (Optional) – The ending index in the string from which the search ends. Default is the end of the string.
count() Return Value
The count() function returns an integer that denotes the number of times the substring occurs in a given string.
Example 1: Count the number of occurrences of a given substring without optional arguments
text = "Python is a popular programming language"

# Note: count() is case-sensitive
print("The count is:",text.count("p"))
print("The count is:",text.count("P"))
Output
The count is: 3
The count is: 1
Example 2: Count the number of occurrences of a given substring with optional arguments
In the first print statement, the string is searched from index 15 till the end of the string and in the second print statement, the string is searched from index 1 to index 12.
text = "Python is a popular programming language"

# Note: count() is case-sensitive
print("The count is:", text.count("a", 15))
print("The count is:", text.count("a", 1, 12))
Output
The count is: 4
The count is: 1
The post Python String count() appeared first on ItsMyCode.
December 18, 2021 06:17 PM UTC
Weekly Python StackOverflow Report
(cccvi) stackoverflow python report
These are the ten most rated questions at Stack Overflow last week.
Between brackets: [question score / answers count]
Build date: 2021-12-18 14:29:24 GMT
- Can a function and local variable have the same name? - [14/4]
- How to override names of dataclasses attributes in Python? - [9/2]
- Ensure that an argument can be iterated twice - [8/4]
- What allows bare class instances to have assignable attributes? - [8/1]
- Python pandas equivalent to R's group_by, mutate, and ifelse - [7/4]
- python pandas "groupby" and "if any" condition - [7/2]
- Pandas group by cumsum with a flag condition - [7/2]
- Filtering a mutli-index - [7/1]
- Pythonic way to make a dictionary from lists of unequal length without padding Nones - [7/1]
- How to get a uniformly-distributed random integer-points in an nD ball? - [7/0]
December 18, 2021 02:29 PM UTC
ItsMyCode
Python String center()
ItsMyCode |
Python String center() method is a built-in function used to align the string to the center by filling the paddings to the left and right of the string with a specified fillchar(default fill character is an ASCII space).
center() Syntax
The syntax of center() method is:
string.center(width[, fillchar])
center() Parameter
The center() function takes 2 parameters.
- width – length of the string with padded characters
- fillchar (optional) – Character which needs to be padded. If not provided, space is used as the default character.
center() Return Value
The center() function returns a string padded with a specified fillchar. It doesn’t modify the original string.
The original string is returned if the width is less than or equal to len(s)
Example 1: center() Method With Default fillchar
text = "Python Rocks"

# Defaults fills with space on both sides of string
new_text = text.center(20)

print("Original String:", text)
print("Centered String:", new_text)
Output
Original String: Python Rocks
Centered String:     Python Rocks
Example 2: center() Method With * fillchar
text = "Python Rocks"

# Defaults fills with * on both sides of string
new_text = text.center(20, "*")

print("Original String:", text)
print("Centered String:", new_text)
Output
Original String: Python Rocks
Centered String: ****Python Rocks****
Example 3: Returns original string if the width is less than length of string
In this example the width specified is 10 and the length of the string is 12. Hence the center() method returns the original string as-is without any padding characters.
text = "Python Rocks"

# width is less then length of string
new_text = text.center(10, "*")

print("Length of string:", len(text))
print("Original String:", text)
print("Centered String:", new_text)
Output
Length of string: 12
Original String: Python Rocks
Centered String: Python Rocks
The post Python String center() appeared first on ItsMyCode.
December 18, 2021 11:20 AM UTC
Python String casefold()
ItsMyCode |
Python String casefold() method is used to implement caseless string matching. Case folding is similar to lowercasing but more aggressive because the casefold() function is more aggressive as it converts all string characters to lowercase. It is intended to remove all case distinctions in a string.
casefold() Syntax
The syntax of casefold() method is:
string.casefold()
casefold() Parameter
The casefold() function does not take any parameters.
casefold() Return Value
The casefold() function returns a copy of the case folded string, i.e., the string is converted to lowercase. It doesn’t modify the original string.
Difference between casefold and lower in Python
The lower() method converts all the uppercase characters in a string to lowercase characters, while the casefold() method converts all the string characters into lowercase. In General, the casefold() method removes all case distinctions present in a string.
For example, the German lowercase letter ‘ß‘ is equivalent to “ss“. Since ‘ß‘ is already lowercase, the lower() method would do nothing to ‘ß‘; however, casefold() still converts it to “ss“.
Example 1: Convert string to lowercase using casefold()
text = "PYTHON CASEFOLD EXAMPLE"

# Prints the lowercase string
print ("Lowercase string is:", text.casefold())
Output
Lowercase string is: python casefold example
Example 2: Compare strings using casefold()
str1 = "Pythonß"
str2 = "Pythonss"

# ß in german is equivalent to ss
if str1.casefold() == str2.casefold():
    print('The given strings are equal.')
else:
    print('The given strings are not equal.')
Output
The given strings are equal.
The post Python String casefold() appeared first on ItsMyCode.
December 18, 2021 10:24 AM UTC
Python String capitalize()
ItsMyCode |
Python string capitalize() method will convert the first letter in a string to uppercase and keep the rest of the characters in lowercase. The capitalize() function does not modify the original string and instead returns a string copy.
capitalize() Syntax
The syntax of capitalize() method is:
string.capitalize()
capitalize() Parameter
The capitalize() function does not take any parameters.
Return Value from capitalize()
The capitalize() function returns a copy of the string with the first character capitalized and all other characters lowercased. It doesn’t modify the original string.
Note: In Python 3.8 onwards, the first character is converted into a title case rather than uppercase. It means that characters like digraphs will only have their first letter capitalized instead of the whole character.
Example: Capitalize a string in Python
# Converts the first character to Uppercase/title case
# keeps rest in lowercase
text1 = "python programming"
print(text1.capitalize())

# Converts the first character to Uppercase/title case
# keeps rest in lowercase
text2= "pYTHON Is FUN"
print(text2.capitalize())

# In case of diagraph the first letter is capitalized
text3= "ß"
print(text3.capitalize())


# In case of non alphabets
text4= "*disclaimer"
print(text4.capitalize())
Output
Python programming
Python is fun
Ss
*disclaimer
The post Python String capitalize() appeared first on ItsMyCode.
December 18, 2021 07:56 AM UTC
December 17, 2021
Test and Code
173: Why NOT unittest?
In the preface of "Python Testing with pytest" I list some reasons to use pytest, under a section called "why pytest?". Someone asked me recently, a different but related question "why NOT unittest?".
unittest is an xUnit style framework. For me, xUnit style frameworks are fatally flawed for software testing.
That's what this episode is about, my opinion of
- "Why NOT unittest?", or more broadly,
- "What are the fatal flaws of xUnit?"
Sponsored By:
Support Test & Code in Python
Links:
In the preface of "Python Testing with pytest" I list some reasons to use pytest, under a section called "why pytest?". Someone asked me recently, a different but related question "why NOT unittest?".
unittest is an xUnit style framework. For me, xUnit style frameworks are fatally flawed for software testing.
That's what this episode is about, my opinion of
"Why NOT unittest?", or more broadly,
"What are the fatal flaws of xUnit?"
Sponsored By:PyCharm Professional: Try PyCharm Pro for 4 months and learn how PyCharm will save you time. Promo Code: TESTANDCODE22Support Test & Code in PythonLinks:Python Testing with pytest, Second Editionunittest docsunittest assert methodsxUnit - Wikipedia
December 17, 2021 08:00 PM UTC
Django Weblog
2021 Malcolm Tredinnick Memorial Prize awarded to Adam Johnson
The Board of the Django Software Foundation is pleased to announce that the 2021 Malcolm Tredinnick Memorial Prize has been awarded to Adam Johnson.
Adam Johnson is a member of the Django Technical Board and a longtime member of the security team. He has contributed a huge amount of code to Django itself and maintains multiple Django third-party packages. He is a co-organizer of The London Django Meetup and regularly gives talks at Django and Python conferences. He has also written a book on Django testing and his personal blog has a lot of content educating people on Python and Django best practices. He is actively helpful on Twitter and the Django mailing lists.
Jeff Triplet, one of the six people who nominated Adam had this to say about Adam:
I think Adam Johnson has done an incredible amount of work and deserves recognition. Between his numerous Django-focused OSS work, his work on Django itself, being on the Technical Board, his weekly blogging efforts, organizing the London Django meetups, speaking at conferences, and being a friendly and welcoming community member with his online persona. I have never formally met Adam, but he seems like a genuinely nice person too.
Other nominations for this year included:
- Andrew Godwin
- Anna Makarudze
- Carlton Gibson
- Dawn Wages
- Frank Wiles
- Haris Khan
- Mowa Ijasanmi
- Paolo Melchiorre
- Simon Drabble
Each year we receive many nominations, and it is always hard to pick the winner. This year we received the highest number of nominations ever received for the Malcolm Tredinnick Memorial Price with some being nominated twice, and the highest being six times. Some people have been nominated in multiple years, so if your nominee didn’t make it this year, you can always nominate them again next year.
Malcolm would be very proud of the legacy he has fostered in our community!
December 17, 2021 02:36 PM UTC
Inspired Python
Five Advanced Pytest Fixture Patterns
Five Advanced Pytest Fixture Patterns
The pytest package is a great test runner, and it comes with a battery of features — among them the fixtures feature. A pytest fixture lets you generate and initialize test data, faked objects, application state, configuration, and much more, with a single decorator and a little ingenuity.
But there’s more to pytest fixtures than meets the eye. Here’s five advanced fixture tips to improve your tests.
Read More ->
December 17, 2021 12:22 PM UTC
Real Python
The Real Python Podcast – Episode #90: A Python Journey: Cyber Security, Automating AWS, and TDD
The Python community continually grows, with many users coming from different languages and backgrounds. This week on the show, we talk with developer Hugh Tipping about his Python journey. Hugh is also a member of the Real Python community.
[ Improve Your Python With ? Python Tricks ? – Get a short & sweet Python Trick delivered to your inbox every couple of days. >> Click here to learn more and see examples ]
December 17, 2021 12:00 PM UTC
Glyph Lefkowitz
No More Stories
This is a bit of a rant, and it's about a topic that I’m not an expert on, but
I do feel strongly about. So, despite the forceful language, please read this
knowing that there’s still a fair amount of epistemic humility behind what I’m
saying and I’m definitely open to updating my opinion if an expert on
journalism or public policy were to have some compelling reason for the
Chestertonian fence of
the structure of journalistic institutions. Comments sections are the devil’s
playground so I don’t have one, but feel free to reach
out and if we have a fruitful discussion
I’m happy to publish it here.
One of the things that COVID has taught me is that the concept of a “story” in
the news media is a relic that needs to be completely re-thought. It is not
suited to the challenges of media communication today.
Specifically, there are challenging and complex public-policy questions which
require robust engagement from an informed electorate. These questions are
open-ended and their answers are unclear. What’s an appropriate strategy for
public safety, for example? Should policing be part of it? I have my
preferred snappy slogans in these areas but if we want to step away from
propaganda for a moment and focus on governance, this is actually a really
difficult question that hinges on a ton of difficult-to-source data.
For most of history, facts were scarce. It was the journalist’s job to find
facts, to write them down, and to circulate them to as many people as possible,
so that the public discourse could at least be fact-based; to have some basis
in objective reality.
In the era of the Internet, though, we are drowning in facts. We don't just
have facts, we have data. We don't just have data, we have metadata; we have
databases and data warehouses and data lakes and all manner of data containers
in between. These data do not coalesce into information on their own, however.
They need to be collected, collated, synthesized, and interpreted.
Thus was born the concept of Data
Journalism. No longer is it
the function of the journalist simply to report the facts; in order for the
discussion to be usefully grounded, they must also aggregate the facts, and
present their aggregation in a way that can be comprehended.
Data journalism is definitely a step up, and there are many excellent
data-journalism projects that have been done. But the problem with these
projects is that they are often individual data-journalism stories that give
a temporal snapshot of one journalist's interpretation of an issue. Just a
tidy little pile of motivated reasoning with a few cherry-picked citations, and
then we move on to the next story.
And that's when we even get data journalism. Most journalism is still just
isolated stories, presented as prose. But this sort of story-after-story
presentation in most publications provides a misleading picture of the
world. Beyond even the sample bias of what kinds of stories get clicks and can
move ad inventory, this sequential chain of disconnected facts is extremely
prone to cherry-picking by bad-faith propagandists, and even much less
malicious problems like recency
bias and the availability
heuristic.
Trying to develop a robust understanding of complex public policy issues by
looking at individual news stories is like trying to map a continent's
coastline by examining individual grains of sand one at a time.
What we need from journalism for the 21st century is a curated set of ongoing
collections of consensus. What the best strategy is to combat COVID might
change over time. Do mask mandates work? You can't possibly answer that
question by scrounging around on pubmed by yourself, or worse yet reading a
jumbled stream of op-ed thinkpieces in the New York Times and the Washington
Post.
During COVID, some major press institutions started caving to the fairly
desperate need for this sort of structure by setting up "trackers" for COVID
vaccinations, case counts, and so on. But these trackers are still fit
awkwardly within the "story" narrative. This
one
from the Washington post is a “story” from 2020, but has data from December
16th, 2021.
These trackers monitor only a few stats though, and don’t provide much in the
way of meta-commentary on pressing questions: do masks work? Do lockdowns work?
How much do we know about the efficacy of various ventilation improvements?
Each journalistic institution should maintain a “tracker” for every issue of
public concern, and ideally they’d be in conversation with each other,
constantly curating their list of sources in real time, updating conclusions as
new data arrives, and recording an ongoing tally of what we can really be
certain about and what is still a legitimate controversy.
December 17, 2021 01:21 AM UTC
December 16, 2021
Codementor
Immersive Big Data Visualization
Over time and technological and scientific advances, the amounts and complexity of the data have increased. Our lives have also become traces of data: transactions in supermarkets, phone calls and...
December 16, 2021 05:58 PM UTC
Python for Beginners
Calculate Average in Python
We have to perform many mathematical calculations in a python program to process any data. In this article, we will look at different ways to calculate the average of given numbers in python.
How to calculate the average of given numbers
The average of given numbers is defined as the sum of all the numbers divided by the total count of the numbers.
For example, if we are given numbers 1, 2, 4, 5, 6, 7, 8, 10, and 12, we can calculate the average of the numbers by first calculating their sum and then dividing the sum by total count of numbers. Here, the sum of all the given numbers is 55 and their total count is 9. So, the average of all the numbers will be 55/9 i.e. 6.111 .
Calculate average using for loop in Python
If we are given a list of numbers, we can calculate the average using the for loop. First, we will declare a sumofNums and a count variable and initialize them to 0. Then, we will traverse each element of the list. While traversing, we will add each element to the sumofNums variable. At the same time, we will also increment the count variable by 1. After traversing the whole list, we will have the sum of all the elements of the list in the sumofNums variable and the total number of elements in the count variable. Now, we can divide the sumofNums by count to obtain the average of the elements of the list as follows.
numbers = [1, 2, 34, 56, 7, 23, 23, 12, 1, 2, 3, 34, 56]
sumOfNums = 0
count = 0
for number in numbers:
    sumOfNums += number
    count += 1
average = sumOfNums / count
print("The list of numbers is:", numbers)
print("The average of all the numbers is:", average)
Output:
The list of numbers is: [1, 2, 34, 56, 7, 23, 23, 12, 1, 2, 3, 34, 56]
The average of all the numbers is: 19.53846153846154
Calculate the average using built-in functions
Instead of using for loops, we can use built-in functions in python to calculate the average of elements in a given list.
We can calculate the sum of all the elements of the list using the sum() method and then we can calculate the total number of elements in the list using the len() method. In this way, we will have the sum of the numbers and the total count of the numbers with which we can calculate the average as follows.
numbers = [1, 2, 34, 56, 7, 23, 23, 12, 1, 2, 3, 34, 56]
sumOfNums = sum(numbers)
count = len(numbers)
average = sumOfNums / count
print("The list of numbers is:", numbers)
print("The average of all the numbers is:", average)
Output:
The list of numbers is: [1, 2, 34, 56, 7, 23, 23, 12, 1, 2, 3, 34, 56]
The average of all the numbers is: 19.53846153846154
Alternatively, we can use the mean() method of the statistics module to directly calculate the average of the elements of the list. We will pass the given list of numbers as input to the mean() method and it will return the average of numbers as shown in the following example.
import statistics
numbers = [1, 2, 34, 56, 7, 23, 23, 12, 1, 2, 3, 34, 56]
average = statistics.mean(numbers)
print("The list of numbers is:", numbers)
print("The average of all the numbers is:", average)
Output:
The list of numbers is: [1, 2, 34, 56, 7, 23, 23, 12, 1, 2, 3, 34, 56]
The average of all the numbers is: 19.53846153846154
Conclusion
In this article, we have discussed different ways to calculate the average of given numbers in Python. You can read about other operations in the article on python operators.
The post Calculate Average in Python appeared first on PythonForBeginners.com.
December 16, 2021 01:28 PM UTC
Brett Cannon
Unravelling `break` and `continue`
I have previously unravelled for loops, and so the concept of looping has already come up in this blog post series of removing the syntactic sugar from Python. But one aspect of looping that I didn&apost touch upon is that of break and continue. Both are statements used to control the flow within a loop, whether it&aposs to leave or jump back to the top of the loop, respectively.
How the bytecode does it
CPython&aposs interpreter has the ability to jump around to various opcodes. That ability is what allows for break and continue to work. Take the following example (whose print call is there just to have a marker for the end of the loop body):
for x in y:
    if a:
        break
    if b:
        continue
    print(&aposhi&apos)
Example
for loop
If you disassemble that for loop you end up with:
  2           0 LOAD_GLOBAL              0 (y)
              2 GET_ITER
        >>    4 FOR_ITER                26 (to 32)
              6 STORE_FAST               0 (x)

  3           8 LOAD_GLOBAL              1 (a)
             10 POP_JUMP_IF_FALSE       16

  4          12 POP_TOP
             14 JUMP_ABSOLUTE           32

  5     >>   16 LOAD_GLOBAL              2 (b)
             18 POP_JUMP_IF_FALSE       22

  6          20 JUMP_ABSOLUTE            4

  7     >>   22 LOAD_GLOBAL              3 (print)
             24 LOAD_CONST               1 (&aposhi&apos)
             26 CALL_FUNCTION            1
             28 POP_TOP
             30 JUMP_ABSOLUTE            4
        >>   32 LOAD_CONST               0 (None)
             34 RETURN_VALUE
Bytecode for the example
for loop
The bytecode at offset 14 is for break and offset 20 is for continue. As you can see they are JUMP_ABSOLUTE statements, which means that when the interpreter runs them it immediately go to the bytecode at those offsets. In this instance break jumps to the end of the function and continue jumps to the top of the for loop. So the bytecode has a way to skip over chunks of code.
How we are going to do it
So how do we do something similar without using those two statements? Exceptions to the rescue! In both instances we need some form of control flow that lets us jump to either the beginning or right after a loop. We can do that based on whether we put the loop inside or outside of a try block.
For break, since we want to jump just passed the end of the loop, we want to put the loop inside of a try block and raise an exception where the break statement was. We can then catch that exception and let execution carry us outside of the loop.
class _BreakStatement(Exception):
    pass

try:
    for x in y:
        if a:
            raise _BreakStatement
        if b:
            continue
        print(&aposhi&apos)
except _BreakStatement:
    pass
Using exceptions to desugar
breakHandling continue is similar, although the try block is inside the loop this time.
class _BreakStatement(Exception):
    pass

class _ContinueStatement(Exception):
    pass

try:
    for x in y:
        try:
            if a:
                raise _BreakStatement
            if b:
                raise _ContinueStatement
            print(&aposhi&apos)
        except _ContinueStatement:
            pass
except _BreakStatement:
    pass
Using exceptions to desugar
continueThanks to the end of the try block for continue extending to the bottom of the loop, control flow will just naturally flow back to the top of the loop as expected.
And a nice thing about this solution is it nests appropriately. Since Python has no way to break out of multiple loops via a single break statement (some languages allow this by letting you label the loop and having the break specify which loop you&aposre breaking out of), you will always hit the tightest try block that you&aposre in. And since you only need one try block per loop for an arbitrary number of break and continue statements, there&aposs no concern of getting it wrong. And this trick is also the idiomatic way to break out of nested loops in Python, so there&aposs already precedent in using it for this sort of control flow.
Bringing else clauses into the mix
This also works nicely for else clauses on for and while loops as they simply become else clauses on the try block! So this:
while x:
    break
else:
    print("no `break`")
Example
while loop with an
else clause
becomes:
try:
    while x:
        raise _BreakStatement
except _BreakStatement:
    pass
else:
    print("no `break`")
Unravelling an
else clause on a loop
It&aposs literally just a move of the entire clause from one statement to another!
December 16, 2021 03:47 AM UTC
Codementor
Encrypt and Decrypt Files using Python
In this article we will discuss how to encrypt and decrypt files using Python.
December 16, 2021 02:51 AM UTC
December 15, 2021
ItsMyCode
Python TypeError: ‘int’ object is not callable
ItsMyCode |
The TypeError: the ‘int’ object is not a callable error occurs if an arithmetic operator is missed while performing the calculations or the reserved keywords are declared as variables and used as functions,
In this tutorial, we will learn what int object is is not callable error means and how to resolve this TypeError in your program with examples.
What is TypeError: the ‘int’ object is not callable?
There are two main scenarios where developers try to call an integer.
- When you try to call the reserved keywords as a function
- Missing an Arithmetic operator while performing the calculation
Scenario 1: When you try to call the reserved keywords as a function
Using the reserved keywords as variables and calling them as functions are developers’ most common mistakes when they are new to Python. Let’s take a simple example to reproduce this issue.
item_price = [10, 33, 55, 77]
sum = 0
sum = sum(item_price)
print("The sum of all the items is:", str(sum))
Output
Traceback (most recent call last):
  File "c:PersonalIJSCodemain.py", line 4, in <module>
    sum = sum(item_price)
TypeError: 'int' object is not callable
If you look at the above code, we have declared the sum as a variable. However, in Python, the sum() is a reserved keyword and a built-in method that adds the items of an iterable and returns the sum.
Since we have declared sum as a variable and used it as a function to add all the items in the list, Python will throw TypeError.
Solution
We can fix this error by renaming the sum variable to total_price, as shown below.
item_price = [10, 33, 55, 77]
total_price = 0
total_price = sum(item_price)
print("The sum of all the items is:", str(total_price))
Output
The sum of all the items is: 175
While performing mathematical calculations, if you miss an arithmetic operator within your code, it leads to TypeError: the ‘int’ object is not a callable error.
Let us take a simple example to calculate the tax for the order. In order to get the tax value, we need to multiply total_value*(tax_percentage/100).
item_price = [10, 23, 66, 45]
tax_percentage = 5
total_value = sum(item_price)
tax_value = total_value(5/100)
print(" The tax amount for the order is:", tax_value)
Output
Traceback (most recent call last):
  File "c:PersonalIJSCodemain.py", line 8, in <module>
    tax_value = total_value(5/100)
TypeError: 'int' object is not callable
We have missed out on the multiplication operator while calculating the tax value in our code, leading to TypeError by the Python interpreter.
Solution
We can fix this issue by adding a multiplication (*) operator to our code, as shown below.
item_price = [10, 23, 66, 45]
tax_percentage = 5
total_value = sum(item_price)
tax_value = total_value*(5/100)
print(" The tax amount for the order is:", tax_value)
Output
The tax amount for the order is: 7.2
Conclusion
The TypeError: the ‘int’ object is not a callable error raised when you try to call the reserved keywords as a function or miss an arithmetic operator while performing mathematical calculations.
Developers should keep the following points in mind to avoid the issue while coding.
- Use descriptive and unique variable names.
- Never use any built-in function, modules, reserved keywords as Python variable names.
- Ensure that arithmetic operators is not missed while performing calculations.
- Do not override built-in functions like
sum(), round(), and use the same methods later in your code to perform operations.
The post Python TypeError: ‘int’ object is not callable appeared first on ItsMyCode.
December 15, 2021 09:57 PM UTC
Python TypeError: ‘NoneType’ object is not subscriptable
ItsMyCode |
If you subscript any object with None value, Python will raise TypeError: ‘NoneType’ object is not subscriptable exception. The term subscript means retrieving the values using indexing.
In this tutorial, we will learn what is NoneType object is not subscriptable error means and how to resolve this TypeError in your program with examples.
What is TypeError: ‘NoneType’ object is not subscriptable?
In Python, the objects that implement the __getitem__ method are called subscriptable objects. For example, lists, dictionaries, tuples are all subscriptable objects. We can retrieve the items from these objects using Indexing.
The TypeError: ‘NoneType’ object is not subscriptable error is the most common exception in Python, and it will occur if you assign the result of built-in methods like append(), sort(), and reverse() to a variable.
When you assign these methods to a variable, it returns a None value. Let’s take an example and see if we can reproduce this issue.
numbers = [4, 5, 7, 1, 3, 6, 9, 8, 0]
output = numbers.sort()
print("The Value in the output variable is:", output)
print(output[0])
Output
The Value in the output variable is: None

Traceback (most recent call last):
  File "c:PersonalIJSCodemain.py", line 9, in <module>
    print(output[0])
TypeError: 'NoneType' object is not subscriptable
If you look at the above example, we have a list with some random numbers, and we tried sorting the list using a built-in sort() method and assigned that to an output variable.
When we print the output variable, we get the value as None. In the next step, we are trying to access the element by indexing, thinking it is of type list, and we get TypeError: ‘NoneType’ object is not subscriptable.
You will get the same error if you perform other operations like append(), reverse(), etc., to the subscriptable objects like lists, dictionaries, and tuples. It is a design principle for all mutable data structures in Python.
TypeError: ‘NoneType’ object is not subscriptable Solution
Now that you have understood, we get the TypeError when we try to perform indexing on the None Value. We will see different ways to resolve the issues.
Our above code was throwing TypeError because the sort() method was returning None value, and we were assigning the None value to an output variable and indexing it.
The best way to resolve this issue is by not assigning the sort() method to any variable and leaving the numbers.sort() as is.
Let’s fix the issue by removing the output variable in our above example and run the code.
numbers = [4, 5, 7, 1, 3, 6, 9, 8, 0]
numbers.sort()
output = numbers[2]
print("The Value in the output variable is:", output)
print(output)
Output
The Value in the output variable is: 3
3
If you look at the above code, we are sorting the list but not assigning it to any variable.
Also, If we need to get the element after sorting, then we should index the original list variable and store it into a variable as shown in the above code.
Conclusion
The TypeError: ‘int’ object is not subscriptable error is raised when you try to access items from a None value using indexing.
Most developers make this common mistake while manipulating subscriptable objects like lists, dictionaries, and tuples. All these built-in methods return a None value, and this cannot be assigned to a variable and indexed.
The post Python TypeError: ‘NoneType’ object is not subscriptable appeared first on ItsMyCode.
December 15, 2021 07:37 PM UTC
Python for Beginners
How to Get a List as User Input in Python
We can take a value as input from the user using the input() function. What if we have to get a list of values as input? In this article, we will discuss two ways to get a list as user input in Python.
Get A List As User Input Using The For Loop
We can get a list of values using the for loop in python. For this, we can first create an empty list and a count variable. After that, we will ask the user for the total count of values in the list. After getting the total count of values, we can run the input() function count number of times using the for loop and add the input to the list using the append() method as follows.
input_count = int(input("Input the Total number of elements in the list:"))
input_list = list()
for i in range(input_count):
    input_value = input("Enter value {}:".format(i + 1))
    input_list.append(input_value)
print("The list given as input by the user is :", input_list)
Output:
Input the Total number of elements in the list:5
Enter value 1:12
Enter value 2:345
Enter value 3:PFB
Enter value 4:12345
Enter value 5:Aditya
The list given as input by the user is : ['12', '345', 'PFB', '12345', 'Aditya']
Get A List As User Input Using The While Loop
Instead of asking the user for total count of input values, we can ask the user to give a special value as input when they want to stop giving values as input. After that, we can keep taking inputs until the user gives the specific value as input signalling that there are no more values left. We can do this using the while loop in python.
In this method, we will first create an empty list and a boolean variable flag. We will initialize the flag to True. Here, flag will work as the decision variable in the while loop. After that we will start taking inputs from users in the while loop and will append them to the list. If the user inputs the specific value signalling that there are no more values left, we will assign False to the flag variable. When the flag’s value turns False, it forces the while loop to terminate.
After the while loop stops execution, we get the list of all the values given as input as seen in the below example.
flag = True
input_list = list()
while flag:
    input_value = input("Enter the value in the list. To finish, press enter key without any input:n")
    if input_value == "":
        flag = False
        continue
    input_list.append(input_value)
print("The list given as input by the user is :", input_list)
Output:
Enter the value in the list. To finish, press enter key without any input:
12
Enter the value in the list. To finish, press enter key without any input:
23
Enter the value in the list. To finish, press enter key without any input:
Aditya
Enter the value in the list. To finish, press enter key without any input:
567
Enter the value in the list. To finish, press enter key without any input:

The list given as input by the user is : ['12', '23', 'Aditya', '567']
Get A List As User Input By Using The input() Method Only Once
We know that taking user input is costly in terms of time and resource as the program has to make system calls while taking inputs from the user. So, to maximize the efficiency of the program, we can avoid multiple use of the input() function while taking a list as user input.
For this, we will ask the user to input all the values in the list by separating them using space characters. After taking the space separated values as input, we will use the python string split operation to get a list of all the input values. This can be observed in the following example.
input_values = input("Enter the values in the list separated by space:n")
input_list = input_values.split()
print("The list given as input by the user is :", input_list)
Output:
Enter the values in the list separated by space:
12 345 Aditya PFB 123345
The list given as input by the user is : ['12', '345', 'Aditya', 'PFB', '123345']
Conclusion
In this article, we have seen different ways to get a list as user input in python. To read about taking inputs from a file in Python, you can read this article on file handling in Python.
The post How to Get a List as User Input in Python appeared first on PythonForBeginners.com.
December 15, 2021 02:08 PM UTC
Stack Abuse
Guide to the Python or Operator
Introduction
The or operator is one of the three existing logical operators in Python (and, or, not), which perform a logical evaluation of the passed operands.
In simple terms, when two operands are passed, it will decide whether the final value of the created logical expression is True or False. The mechanism used to evaluate the value of the final expression is based on the set of rules known as Boolean algebra.
In this guide, we'll cover the or operator in Python as well as its most common use cases.
or Operator Basics
Python's or operator just performs logical disjunction on the two provided operands. Assuming that the operands are simply two Boolean values, the rule on how to use the or operator is pretty straight-forward:
If either one of two operands has the value True, the whole expression has the value True. In all other cases, the whole expression has the value False.
Now let's take a look at the truth table of the or operator:
| Operand 1 |
Operand 2 |
OR Expression Value |
| True |
True |
True |
| True |
False |
True |
| False |
True |
True |
| False |
False |
False |
This table describes the law of logical disjunction. By looking at this table, we can see that the or operator produces False as the result only if both of the operands are False as well.
All of this leads us to the concept of lazy evaluation. A mechanism used to optimize calculations of mathematical operations. In this particular case, it is used to speed up the process of evaluating Boolean expressions with the or operator.
We already know that an or expression results in a True value if either of its two operands is True. Therefore, in a Boolean expression consisting of multiple operands, it is completely unnecessary to evaluate each one of them individually.
It's enough just to read the values of operands one after the other. When we come across a True for the first time, we can safely just ignore all of the other operands and just evaluate the whole expression as True.
On the other hand, if there is no operand with the value True, we must evaluate the whole expression with the value False. That is the basic principle of lazy evaluation - don't evaluate if you don't have to.
Using or on Boolean Variables
The or operator in Python is used to evaluate two of its operands. In this section, we'll focus on the case where both of the operands have Boolean values. In some cases, the or operator can be used with non-Boolean values, which we'll discuss in the following sections.
Let's take a look at how to use the or operator with two Boolean values:
result1 = True or False
result2 = False or False

print('R1:', result1)
print('R2:', result2)
In this example, we can see how the or operator evaluates expressions consisting only of simple Boolean values. As described in the previous sections, this piece of code will have the following output:
R1: True
R2: False
In the previous example, we've named Boolean expressions result1 and result2. That way, we've created two Boolean variables with values True and False, respectively.
Those two variables can be used as the operands of another Boolean expression and, therefore, could be considered as subexpressions of the more complex Boolean expression. That's the general principle used to build more complex Boolean expressions layer by layer:
result3 = result1 or result2
result4 = result3 or True

print('R3:', result3)
print('R4:', result4)
As expected, this will output:
R3: True
R4: True
result4 is a complex Boolean expression consisting of multiple subexpressions and Boolean values. Let's take a look at the process of unfolding it:
1. result4 = result3 or True
2. result4 = (result1 or result2) or True
3. result4 = ((True or False) or (False or False)) or True
Based on the associative law for the or operator, we know that the order in which we apply the operator doesn't have an impact on the value of the Boolean expression, so there is no need for brackets. Therefore, we can transform result4 one step further by deleting all of the brackets:
result4 = True or False or False or False or True
Using or on Non-Boolean Variables
The or operator in Python can also be used with variables other than Boolean. You can even mix and match Boolean variables with non-Boolean variables. In this section, we'll go over some examples that illustrate the usage of the or operator with variables of different data types.
Generally speaking, any object or a variable in Python is considered to be True unless its class has a predefined __bool__() method that returns False or a __len__() method that returns 0.
In simple terms that means that only objects considered to be False are those which are predefined to be False or those which are empty - empty lists, tuples, strings, dictionaries... The Official Python documentation gives us the list of some of the most common built-in objects considered to be False:
- Constants defined to be false:
None and False.
- Zero of any numeric type:
0, 0.0, 0j, Decimal(0), Fraction(0, 1)
- Empty sequences and collections:
'', (), [], {}, set(), range(0)
Note: These are also known as Falsy Values - the ones you'd intuitively be able to reduce to a False boolean value. The opposite values are Truthy Values.
Another very important fact is that the or operator in this case returns the actual object, not the True/False value of the object.
Let's take a look at the example that illustrates mentioned behavior:
exp = {} or 'This is a string'
As stated before, the first operand - {} (empty dictionary) is considered to be False and the second operand - 'This is a string' (not an empty string) is considered to be True. This means that the previous expression is implicitly transformed to:
Here, exp is evaluated to True. But, when we try to print the original exp value, instead of True, the output will be:
'This is a string'
This example illustrates the case when the or operator returns the object itself instead of its True/False value. To sum this behavior up, we can illustrate it with the altered (truth) table of the or operator:
| object1 (value) |
object2 (value) |
object1 `or` object2 (return value) |
| True |
True |
object1 |
| True |
False |
object1 |
| False |
True |
object2 |
| False |
False |
object2 |
This also applies when we combine usual Boolean values and objects in Boolean expressions.
If the expression contains at least one value that is considered to be True, the value of the expression is True, but the return value can vary based on the first True element in it.
If the first True operand to be found in the expression is a simple Boolean value, the return value will be True, but if the first True element is some sort of an object, the return value will be that object itself. For example, the following expression will return True:
0 or True
And the following expression will return [1, 2, 3], which is the first True operand found:
False or [1, 2, 3]
On the other hand, if a Boolean expression is False, meaning that no True operand was found, its return value will be its last operand, either object or False:
{} or 0.0 or [] or False or ()
Conclusion
In this guide, we've explained the usage of the or operator in Python. We've introduced the syntax in Python and described how the or operator evaluates Boolean expressions and how it determine the proper return value based on the operands.
Besides its primary usage for evaluating Boolean expressions, the or operator can also be pretty useful in some other use cases.
Its features make it a good choice when you need to set default values for some variables or a default return value of a function and much more, but those special use cases are far beyond the scope of this article, so we'll let you explore all the use cases that the or operator can be utilized in.
December 15, 2021 11:30 AM UTC
Python GUIs
An introduction to PyQt6 Signals, Slots and Events — Triggering actions in response to user behaviors and GUI events (updated for PyQt6)
So far we've created a window and added a simple push button widget to it, but the button doesn't do anything. That's not very useful at all -- when you create GUI applications you typically want them to do something! What we need is a way to connect the action of pressing the button to making something happen. In Qt, this is provided by signals and slots or events.
Signals & Slots
Signals are notifications emitted by widgets when something happens. That something can be any number of things, from pressing a button, to the text of an input box changing, to the text of the window changing. Many signals are initiated by user action, but this is not a rule.
In addition to notifying about something happening, signals can also send data to provide additional context about what happened.
You can also create your own custom signals, which we'll explore later.
Slots is the name Qt uses for the receivers of signals. In Python any function (or method) in your application can be used as a slot -- simply by connecting the signal to it. If the signal sends data, then the receiving function will receive that data too. Many Qt widgets also have their own built-in slots, meaning you can hook Qt widgets together directly.
Let's take a look at the basics of Qt signals and how you can use them to hook widgets up to make things happen in your apps.
Save the following app outline to a file named app.py.
python
import sys
from PyQt6.QtWidgets import QApplication, QMainWindow, QPushButton

class MainWindow(QMainWindow):

    def __init__(self):
        super(MainWindow, self).__init__()

        self.setWindowTitle("My App")


app = QApplication(sys.argv)

window = MainWindow()
window.show()

app.exec()
QPushButton Signals
Our simple application currently has a QMainWindow with a QPushButton set as the central widget. Let's start by hooking up this button to a custom Python method. Here we create a simple custom slot named the_button_was_clicked which accepts the clicked signal from the QPushButton.
python
import sys
from PyQt6.QtWidgets import QApplication, QMainWindow, QPushButton


class MainWindow(QMainWindow):
    def __init__(self):
        super().__init__()

        self.setWindowTitle("My App")

        button = QPushButton("Press Me!")
        button.setCheckable(True)
        button.clicked.connect(self.the_button_was_clicked)

        # Set the central widget of the Window.
        self.setCentralWidget(button)

    def the_button_was_clicked(self):
        print("Clicked!")


app = QApplication(sys.argv)

window = MainWindow()
window.show()

app.exec()
Run it! If you click the button you'll see the text "Clicked!" on the console.
python
Clicked!
Clicked!
Clicked!
Clicked!
Receiving data
That's a good start! We've heard already that signals can also send data to provide more information about what has just happened. The .clicked signal is no exception, also providing a checked (or toggled) state for the button. For normal buttons this is always False, so our first slot ignored this data. However, we can make our button checkable and see the effect.
In the following example, we add a second slot which outputs the checkstate.
python
class MainWindow(QMainWindow):
    def __init__(self):
        super().__init__()

        self.setWindowTitle("My App")

        button = QPushButton("Press Me!")
        button.setCheckable(True)
        button.clicked.connect(self.the_button_was_clicked)
        button.clicked.connect(self.the_button_was_toggled)

        self.setCentralWidget(button)

    def the_button_was_clicked(self):
        print("Clicked!")

    def the_button_was_toggled(self, checked):
        print("Checked?", checked)
Run it! If you press the button you'll see it highlighted as checked. Press it again to release it. Look for the check state in the console.
python
Clicked!
Checked? True
Clicked!
Checked? False
Clicked!
Checked? True
Clicked!
Checked? False
Clicked!
Checked? True
You can connect as many slots to a signal as you like and can respond to different versions of signals at the same time on your slots.
Storing data
Often it is useful to store the current state of a widget in a Python variable. This allows you to work with the values like any other Python variable and without accessing the original widget. You can either store these values as individual variables or use a dictionary if you prefer. In the next example we store the checked value of our button in a variable called button_is_checked on self.
python
class MainWindow(QMainWindow):
    def __init__(self):
        super().__init__()

        self.button_is_checked = True

        self.setWindowTitle("My App")

        button = QPushButton("Press Me!")
        button.setCheckable(True)
        button.clicked.connect(self.the_button_was_toggled)
        button.setChecked(self.button_is_checked)

        self.setCentralWidget(button)

    def the_button_was_toggled(self, checked):
        self.button_is_checked = checked

        print(self.button_is_checked)
First we set the default value for our variable (to True), then use the default value to set the initial state of the widget.
When the widget state changes, we receive the signal and update the variable to match.
You can use this same pattern with any PyQt widgets. If a widget does not provide a signal that sends the current state, you will need to retrieve the value from the widget directly in your handler. For example, here we're checking the checked state in a pressed handler.
python
class MainWindow(QMainWindow):
    def __init__(self):
        super().__init__()

        self.button_is_checked = True

        self.setWindowTitle("My App")

        self.button = QPushButton("Press Me!")
        self.button.setCheckable(True)
        self.button.released.connect(self.the_button_was_released)
        self.button.setChecked(self.button_is_checked)

        self.setCentralWidget(self.button)

    def the_button_was_released(self):
        self.button_is_checked = self.button.isChecked()

        print(self.button_is_checked)
We need to keep a reference to the button on self so we can access it in our slot.
The released signal fires when the button is released, but does not send the check state, so instead we use .isChecked() to get the check state from the button in our handler.
Changing the interface
So far we've seen how to accept signals and print output to the console. But how about making something happen in the interface when we click the button? Let's update our slot method to modify the button, changing the text and disabling the button so it is no longer clickable. We'll also turn off the checkable state for now.
python
class MainWindow(QMainWindow):
    def __init__(self):
        super().__init__()

        self.setWindowTitle("My App")

        self.button = QPushButton("Press Me!")
        self.button.clicked.connect(self.the_button_was_clicked)

        self.setCentralWidget(self.button)

    def the_button_was_clicked(self):
        self.button.setText("You already clicked me.")
        self.button.setEnabled(False)

        # Also change the window title.
        self.setWindowTitle("My Oneshot App")
Again, because we need to be able to access the button in our the_button_was_clicked method, we keep a reference to it on self.
The text of the button is changed by passing a str to .setText(). To disable a button call .setEnabled() with False.
Run it! If you click the button the text will change and the button will become unclickable.
You're not restricted to changing the button that triggers the signal, you can do anything you want in your slot methods. For example, try adding the following line to the_button_was_clicked method to also change the window title.
python
self.setWindowTitle("A new window title")
Most widgets have their own signals -- and the QMainWindow we're using for our window is no exception. In the following more complex example, we connect the .windowTitleChanged signal on the QMainWindow to a custom slot method.
In the following example we connect the .windowTitleChanged signal on the QMainWindow to a method slot the_window_title_changed. This slot also receives the new window title.
python
from PyQt6.QtWidgets import QApplication, QMainWindow, QPushButton

import sys
from random import choice

window_titles = [
    'My App',
    'My App',
    'Still My App',
    'Still My App',
    'What on earth',
    'What on earth',
    'This is surprising',
    'This is surprising',
    'Something went wrong'
]


class MainWindow(QMainWindow):
    def __init__(self):
        super().__init__()

        self.n_times_clicked = 0

        self.setWindowTitle("My App")

        self.button = QPushButton("Press Me!")
        self.button.clicked.connect(self.the_button_was_clicked)

        self.windowTitleChanged.connect(self.the_window_title_changed)

        # Set the central widget of the Window.
        self.setCentralWidget(self.button)

    def the_button_was_clicked(self):
        print("Clicked.")
        new_window_title = choice(window_titles)
        print("Setting title:  %s" % new_window_title)
        self.setWindowTitle(new_window_title)

    def the_window_title_changed(self, window_title):
        print("Window title changed: %s" % window_title)

        if window_title == 'Something went wrong':
            self.button.setDisabled(True)


app = QApplication(sys.argv)

window = MainWindow()
window.show()

app.exec()
First we set up a list of window titles -- we'll select one at random from this list using Python's built-in random.choice().
We hook our custom slot method the_window_title_changed to the window's .windowTitleChanged signal.
When we click the button the window title will change at random. If the new window title equals "Something went wrong" the
button will be disabled.
Run it! Click the button repeatedly until the title changes to "Something went wrong" and the button will become disabled.
There are a few things to notice in this example.
Firstly, the windowTitleChanged signal is not always emitted when setting the window title. The signal only fires if the new title is changed from the previous one. If you set the same title multiple times, the signal will only be fired the first time. It is important to double-check the conditions under which signals fire, to avoid being surprised when using them in your app.
Secondly, notice how we are able to chain things together using signals. One thing happening -- a button press -- can trigger multiple other things to happen in turn. These subsequent effects do not need to know what caused them, but simply follow as a consequence of simple rules. This decoupling of effects from their triggers is one of the key concepts to understand when building GUI applications. We'll keep coming back to this throughout the book!
In this section we've covered signals and slots. We've demonstrated some simple signals and how to use them to pass data and state around your application. Next we'll look at the widgets which Qt provides for use in your applications -- together with the signals they provide.
Connecting widgets together directly
So far we've seen examples of connecting widget signals to Python methods. When a signal is fired from the widget, our
Python method is called and receives the data from the signal. But you don't always need to use a Python function
to handle signals -- you can also connect Qt widgets directly to one another.
In the following example, we add a QLineEdit widget and a QLabel to the window. In the \__init__ for the window
we connect our line edit .textChanged signal to the .setText method on the QLabel. Now any time the text changes
in the QLineEdit the QLabel will receive that text to it's .setText method.
python
from PyQt6.QtWidgets import QApplication, QMainWindow, QLabel, QLineEdit, QVBoxLayout, QWidget

import sys


class MainWindow(QMainWindow):
    def __init__(self):
        super().__init__()

        self.setWindowTitle("My App")

        self.label = QLabel()

        self.input = QLineEdit()
        self.input.textChanged.connect(self.label.setText)

        layout = QVBoxLayout()
        layout.addWidget(self.input)
        layout.addWidget(self.label)

        container = QWidget()
        container.setLayout(layout)

        # Set the central widget of the Window.
        self.setCentralWidget(container)


app = QApplication(sys.argv)

window = MainWindow()
window.show()

app.exec()
Notice that in order to connect the input to the label, the input and label must both be defined.
This code adds the two widgets to a layout, and sets that on the window. We'll cover layouts in detail later, you can ignore it for now.
Run it! Type some text in the upper box, and you'll see it appear immediately on the label.
 Any text typed in the input immediately appears on the label.
Most Qt widgets have slots available, to which you can connect any signal that emits the same type that it accepts.
The widget documentation has the slots for each widget listed under "Public Slots". For example, see https://doc.qt.io/qt-5/qlabel.html#public-slots[QLabel].
Events
Every interaction the user has with a Qt application is an event. There are many types of event, each representing a different type of interaction. Qt represents these events using event objects which package up information about what happened. These events are passed to specific event handlers on the widget where the interaction occurred.
By defining custom, or extended event handlers you can alter the way your widgets respond to these events. Event handlers are defined just like any other method, but the name is specific for the type of event they handle.
One of the main events which widgets receive is the QMouseEvent. QMouseEvent events are created for each and every mouse movement and button click on a widget. The following event handlers are available for handling mouse events --
| Event handler |
Event type moved |
mouseMoveEvent |
Mouse moved |
mousePressEvent |
Mouse button pressed |
mouseReleaseEvent |
Mouse button released |
mouseDoubleClickEvent |
Double click detected |
For example, clicking on a widget will cause a QMouseEvent to be sent to the .mousePressEvent event handler on that widget. This handler can use the event object to find out information about what happened, such as what triggered the event and where specifically it occurred.
You can intercept events by sub-classing and overriding the handler method on the class. You can choose to filter, modify, or ignore events, passing them up to the normal handler for the event by calling the parent class function with super(). These could be added to your main window class as follows. In each case e will receive the incoming event.
python
import sys

from PyQt6.QtCore import Qt
from PyQt6.QtWidgets import QApplication, QLabel, QMainWindow, QTextEdit


class MainWindow(QMainWindow):
    def __init__(self):
        super().__init__()
        self.label = QLabel("Click in this window")
        self.setCentralWidget(self.label)

    def mouseMoveEvent(self, e):
        self.label.setText("mouseMoveEvent")

    def mousePressEvent(self, e):
        self.label.setText("mousePressEvent")

    def mouseReleaseEvent(self, e):
        self.label.setText("mouseReleaseEvent")

    def mouseDoubleClickEvent(self, e):
        self.label.setText("mouseDoubleClickEvent")


app = QApplication(sys.argv)

window = MainWindow()
window.show()

app.exec()
Run it! Try moving and clicking (and double-clicking) in the window and watch the events appear.
You'll notice that mouse move events are only registered when you have the button pressed down. You can change this by calling self.setMouseTracking(True) on the window. You may also notice that the press (click) and double-click events both fire when the button is pressed down. Only the release event fires when the button is released. Typically to register a click from a user you should watch for both the mouse down and the release.
Inside the event handlers you have access to an event object. This object contains information about the event and can be used to respond differently depending on what exactly has occurred. We'll look at the mouse event objects next.
Mouse events
All mouse events in Qt are tracked with the QMouseEvent object, with information about the event being readable from the following event methods.
| Method |
Returns |
.button() |
Specific button that triggered this event |
.buttons() |
State of all mouse buttons (OR'ed flags) |
.position() |
Widget-relative position as a QPoint integer |
You can use these methods within an event handler to respond to different events differently, or ignore them completely. The positional methods provide both global and local (widget-relative) position information as QPoint objects, while buttons are reported using the mouse button types from the Qt namespace.
For example, the following allows us to respond differently to a left, right or middle click on the window.
python
    def mousePressEvent(self, e):
        if e.button() == Qt.LeftButton:
            # handle the left-button press in here
            self.label.setText("mousePressEvent LEFT")

        elif e.button() == Qt.MiddleButton:
            # handle the middle-button press in here.
            self.label.setText("mousePressEvent MIDDLE")

        elif e.button() == Qt.RightButton:
            # handle the right-button press in here.
            self.label.setText("mousePressEvent RIGHT")

    def mouseReleaseEvent(self, e):
        if e.button() == Qt.LeftButton:
            self.label.setText("mouseReleaseEvent LEFT")

        elif e.button() == Qt.MiddleButton:
            self.label.setText("mouseReleaseEvent MIDDLE")

        elif e.button() == Qt.RightButton:
            self.label.setText("mouseReleaseEvent RIGHT")

    def mouseDoubleClickEvent(self, e):
        if e.button() == Qt.LeftButton:
            self.label.setText("mouseDoubleClickEvent LEFT")

        elif e.button() == Qt.MiddleButton:
            self.label.setText("mouseDoubleClickEvent MIDDLE")

        elif e.button() == Qt.RightButton:
            self.label.setText("mouseDoubleClickEvent RIGHT")
The button identifiers are defined in the Qt namespace, as follows --
| Identifier |
Value (binary) |
Represents |
Qt.NoButton |
0 (000) |
No button pressed, or the event is not related to button press. |
Qt.LeftButton |
1 (001) |
The left button is pressed |
Qt.RightButton |
2 (010) |
The right button is pressed. |
Qt.MiddleButton |
4 (100) |
The middle button is pressed. |
On right-handed mice the left and right button positions are reversed, i.e. pressing the right-most button will return Qt.LeftButton. This means you don't need to account for the mouse orientation in your code.
Context menus
Context menus are small context-sensitive menus which typically appear when right clicking on a window. Qt has support for generating these menus, and widgets have a specific event used to trigger them. In the following example we're going to intercept the .contextMenuEvent a QMainWindow. This event is fired whenever a context menu is about to be shown, and is passed a single value event of type QContextMenuEvent.
To intercept the event, we simply override the object method with our
new method of the same name. So in this case we can create a method
on our MainWindow subclass with the name contextMenuEvent and it
will receive all events of this type.
python
import sys

from PyQt6.QtCore import Qt
from PyQt6.QtGui import QAction
from PyQt6.QtWidgets import QApplication, QLabel, QMainWindow, QMenu


class MainWindow(QMainWindow):
    def __init__(self):
        super().__init__()

    def contextMenuEvent(self, e):
        context = QMenu(self)
        context.addAction(QAction("test 1", self))
        context.addAction(QAction("test 2", self))
        context.addAction(QAction("test 3", self))
        context.exec(e.globalPos())


app = QApplication(sys.argv)

window = MainWindow()
window.show()

app.exec()
If you run the above code and right-click within the window, you'll see
a context menu appear. You can set up .triggered slots on your menu
actions as normal (and re-use actions defined for menus and toolbars).
When passing the initial position to the exec function, this
must be relative to the parent passed in while defining. In this case
we pass self as the parent, so we can use the global position.
Just for completeness, there is actually a signal-based approach to
creating context menus.
python
class MainWindow(QMainWindow):
    def __init__(self):
        super().__init__()
        self.show()

        self.setContextMenuPolicy(Qt.CustomContextMenu)
        self.customContextMenuRequested.connect(self.on_context_menu)

    def on_context_menu(self, pos):
        context = QMenu(self)
        context.addAction(QAction("test 1", self))
        context.addAction(QAction("test 2", self))
        context.addAction(QAction("test 3", self))
        context.exec(self.mapToGlobal(pos))
It's entirely up to you which you choose.
Event hierarchy
In PyQt every widget is part of two distinct hierarchies: the Python object hierarchy, and the Qt layout hierarchy. How you respond or ignore events can affect how your UI behaves.
Python inheritance forwarding
Often you may want to intercept an event, do something with it, yet still trigger the default event handling behavior. If your object is inherited from a standard widget, it will likely have sensible behavior implemented by default. You can trigger this by calling up to the parent implementation using super().
This is the Python parent class, not the PyQt .parent().
python
def mousePressEvent(self, event):
    print("Mouse pressed!")
    super(self, MainWindow).contextMenuEvent(event)
The event will continue to behave as normal, yet you've added some non-interfering behavior.
Layout forwarding
When you add a widget to your application, it also gets another parent from the layout. The parent of a widget can be found by calling .parent(). Sometimes you specify these parents manually, such as for QMenu or QDialog, often it is automatic. When you add a widget to your main window for example, the main window will become the widget's parent.
When events are created for user interaction with the UI, these events are passed to the uppermost widget in the UI. So, if you have a button on a window, and click the button, the button will receive the event first.
If the first widget cannot handle the event, or chooses not to, the event will bubble up to the parent widget, which will be given a turn. This bubbling continues all the way up nested widgets, until the event is handled or it reaches the main window.
In your own event handlers you can choose to mark an event as handled
calling .accept() --
python
    class CustomButton(QPushButton)
        def mousePressEvent(self, e):
            e.accept()
Alternatively, you can mark it as unhandled by calling .ignore() on the event object. In this case the event will continue to bubble up the hierarchy.
python
    class CustomButton(QPushButton)
        def event(self, e):
            e.ignore()
If you want your widget to appear transparent to events, you can safely ignore events which you've actually responded to in some way. Similarly, you can choose to accept events you are not responding to in order to silence them.
For an in-depth guide to building Python GUIs with PyQt6 see my book, Create GUI Applications with Python & Qt6.
December 15, 2021 09:00 AM UTC
Talk Python to Me
#345: 10 Tips and Tools for Developer Productivity
You know that feeling when one of your developer friends or colleague tells you about some amazing tool, library, or shell environment that you never heard of that you just have to run out and try right away? This episode is jam-packed full of those moments. We welcome back Jay Miller to discuss tools and tips for developer productivity. The title says 10 tips, but we actually veer into many more along the way. I think you'll really enjoy this useful and light-hearted episode.<br/>
<br/>
<strong>Links from the show</strong><br/>
<br/>
<div><b>Jay on Twitter</b>: <a href="https://twitter.com/kjaymiller" target="_blank" rel="noopener">@kjaymiller</a><br/>
<b>More Oh my ZSH plugins</b>: <a href="https://github.com/ohmyzsh/ohmyzsh/wiki/Plugins" target="_blank" rel="noopener">github.com</a><br/>
<b>exa</b>: <a href="https://the.exa.website" target="_blank" rel="noopener">the.exa.website</a><br/>
<b>bat</b>: <a href="https://github.com/sharkdp/bat" target="_blank" rel="noopener">github.com</a><br/>
<b>ripgrep/amber</b>: <a href="https://github.com/dalance/amber" target="_blank" rel="noopener">github.com</a><br/>
<b>Neovim</b>: <a href="https://neovim.io/" target="_blank" rel="noopener">neovim.io</a><br/>
<b>RUMPS macOS Framework</b>: <a href="https://github.com/jaredks/rumps" target="_blank" rel="noopener">github.com</a><br/>
<b>Black</b>: <a href="https://github.com/psf/black" target="_blank" rel="noopener">github.com</a><br/>
<b>pypi-changes package</b>: <a href="https://pypi-changes.readthedocs.io/en/latest/" target="_blank" rel="noopener">readthedocs.io</a><br/>
<b>asdf-python</b>: <a href="https://github.com/danhper/asdf-python" target="_blank" rel="noopener">github.com</a><br/>
<b>WAVE Web Accessibility Evaluation Tool</b>: <a href="https://wave.webaim.org/" target="_blank" rel="noopener">wave.webaim.org</a><br/>
<b>Google PageSpeed</b>: <a href="https://pagespeed.web.dev/" target="_blank" rel="noopener">pagespeed.web.dev</a><br/>
<b>XKCD Commit messages</b>: <a href="https://xkcd.com/1296/" target="_blank" rel="noopener">xkcd.com</a><br/>
<b>secure package</b>: <a href="https://github.com/TypeError/secure" target="_blank" rel="noopener">github.com</a><br/>
<b>OWASP Top 10</b>: <a href="https://owasp.org/Top10/" target="_blank" rel="noopener">owasp.org</a><br/>
<b>ngrok</b>: <a href="https://ngrok.com/" target="_blank" rel="noopener">ngrok.com</a><br/>
<b>starship</b>: <a href="https://starship.rs/" target="_blank" rel="noopener">starship.rs</a><br/>
<b>Homebrew</b>: <a href="https://brew.sh/" target="_blank" rel="noopener">brew.sh</a><br/>
<b>Chocolatey</b>: <a href="https://chocolatey.org/" target="_blank" rel="noopener">chocolatey.org</a><br/>
<b>pip-tools</b>: <a href="https://github.com/jazzband/pip-tools/" target="_blank" rel="noopener">github.com</a><br/>
<b>Let's Encrypt</b>: <a href="https://letsencrypt.org/" target="_blank" rel="noopener">letsencrypt.org</a><br/>
<b>Sourcetree Git App</b>: <a href="https://www.sourcetreeapp.com/" target="_blank" rel="noopener">sourcetreeapp.com</a><br/>
<b>Oh my ZSH</b>: <a href="https://ohmyz.sh/" target="_blank" rel="noopener">ohmyz.sh</a><br/>
<b>nerd fonts</b>: <a href="https://www.nerdfonts.com/font-downloads" target="_blank" rel="noopener">nerdfonts.com</a><br/>
<b>Oh my Posh</b>: <a href="https://ohmyposh.dev/" target="_blank" rel="noopener">ohmyposh.dev</a><br/>
<b>Windows Terminal</b>: <a href="https://www.microsoft.com/en-us/p/windows-terminal/9n0dx20hk701" target="_blank" rel="noopener">microsoft.com</a><br/>
<b>McFly shell history</b>: <a href="https://github.com/cantino/mcfly" target="_blank" rel="noopener">github.com</a><br/>
<b>Fig IO enhanced shell</b>: <a href="https://fig.io/" target="_blank" rel="noopener">fig.io</a><br/>
<b>Conduit podcast</b>: <a href="https://www.relay.fm/conduit" target="_blank" rel="noopener">relay.fm</a><br/>
<b>htmx course at Talk Python</b>: <a href="https://talkpython.fm/htmx" target="_blank" rel="noopener">talkpython.fm/htmx</a><br/>
<b>Watch this episode on YouTube</b>: <a href="https://www.youtube.com/watch?v=XtJQR5RyURA" target="_blank" rel="noopener">youtube.com</a><br/>
<b>Episode transcripts</b>: <a href="https://talkpython.fm/episodes/transcript/345/10-tips-and-tools-for-developer-productivity" target="_blank" rel="noopener">talkpython.fm</a><br/>
<br/>
<b>--- Stay in touch with us ---</b><br/>
<b>Subscribe on YouTube</b>: <a href="https://talkpython.fm/youtube" target="_blank" rel="noopener">youtube.com</a><br/>
<b>Follow Talk Python on Twitter</b>: <a href="https://twitter.com/talkpython" target="_blank" rel="noopener">@talkpython</a><br/>
<b>Follow Michael on Twitter</b>: <a href="https://twitter.com/mkennedy" target="_blank" rel="noopener">@mkennedy</a><br/></div><br/>
<strong>Sponsors</strong><br/>
<a href='https://talkpython.fm/coiled'>Coiled</a><br>
<a href='https://talkpython.fm/cockroachdb'>CockroachDB</a><br>
<a href='https://talkpython.fm/assemblyai'>AssemblyAI</a><br>
<a href='https://talkpython.fm/training'>Talk Python Training</a>
December 15, 2021 08:00 AM UTC
Python Bytes
#263 It’s time to stop using Python 3.6
<p><strong>Watch the live stream:</strong></p>
<a href='https://www.youtube.com/watch?v=YHeB1U30mtk' style='font-weight: bold;'>Watch on YouTube</a><br>
<br>
<p><strong>About the show</strong></p>
<p>Sponsored by <strong>us:</strong></p>
<ul>
<li>Check out the <a href="https://training.talkpython.fm/courses/all"><strong>courses over at Talk Python</strong></a></li>
<li>And <a href="https://pythontest.com/pytest-book/"><strong>Brian’s book too</strong></a>!</li>
</ul>
<p>Special guest: <a href="https://twitter.com/lais_bsc"><strong>Laís Carvalho</strong></a></p>
<p><strong>Michael #1:</strong> <a href="https://www.djangoproject.com/weblog/2021/dec/07/django-40-released/"><strong>Django 4.0 released</strong></a></p>
<ul>
<li>Django is picking up speed:</li>
<li>4.0 Dec 2021 (+1)</li>
<li>3.0 Dec 2020 (+3)</li>
<li>2.0 Dec 2017 (+7)</li>
<li>1.0.1 May 2010</li>
<li>Feature highlights:
<ul>
<li>The new <a href="https://docs.djangoproject.com/en/4.0/releases/4.0/#redis-cache-backend">RedisCache backend</a> provides built-in support for caching with Redis.</li>
<li>To ease customization of Forms, Formsets, and ErrorList they are now <a href="https://docs.djangoproject.com/en/4.0/releases/4.0/#template-based-form-rendering">rendered using the template engine</a>.</li>
<li>The Python standard library’s zoneinfo is now the <a href="https://docs.djangoproject.com/en/4.0/releases/4.0/#zoneinfo-default-timezone-implementation">default timezone implementation in Django</a>.</li>
<li><strong>scrypt password hasher</strong>: The new scrypt password hasher is more secure and recommended over PBKDF2. However, it’s not the default as it requires OpenSSL 1.1+ and more memory.</li>
</ul></li>
<li>Django 3.2 has reached the end of mainstream support. The final minor bug fix release, <a href="https://docs.djangoproject.com/en/stable/releases/3.2.10/">3.2.10</a>, was issued today. Django 3.2 is an LTS release and will receive security and data loss fixes until April 2024.</li>
<li>Some <a href="https://docs.djangoproject.com/en/4.0/releases/4.0/#backwards-incompatible-4-0">backwards incompatible changes</a> you’ll want to be aware of when upgrading from Django 3.2 or earlier. </li>
<li>They’ve <a href="https://docs.djangoproject.com/en/4.0/releases/4.0/#deprecated-features-4-0">begun the deprecation process for some features</a>.</li>
<li>Django 4.0 supports Python 3.8, 3.9, and 3.10.</li>
</ul>
<p><strong>Brian #2:</strong> <a href="https://github.com/dflook/python-minifier"><strong>python-minifier</strong></a></p>
<ul>
<li>Suggested by Lance Reinsmith</li>
<li>My first thought was “we don’t need a minifier for Python”</li>
<li>The docs give one reason:
<ul>
<li>“AWS Cloudformation templates may have AWS lambda function source code embedded in them, but only if the function is less than 4KiB. I wrote this package so I could write python normally and still embed the module in a template.”</li>
</ul></li>
<li>Lance has another reason:
<ul>
<li>“I needed it because the RAM on Adafruit boards using the common M0 chip is around 192KB to 256KB total--not all of which is available to your program. To get around this, you can either 1) compile your code to an .mpy file or 2) minify it. The second worked for me and allowed me to alter it without constantly re-compiling.”</li>
</ul></li>
<li>Fair enough, what does it do?</li>
<li>All of these features are options you can turn off, and are documented well:
<ul>
<li>Combine Import statements</li>
<li>Remove Pass statements</li>
<li>Remove literal statements (docstrings)</li>
<li>Remove Annotations</li>
<li>Hoist Literals</li>
<li>Rename Locals, with preserved Locals list </li>
<li>Rename Globals, with preserved Globals list</li>
<li>Convert Positional-Only Arguments to Normal Arguments</li>
</ul></li>
<li>Also looks like it replaces spaces with tabs
<ul>
<li>Begrudgingly, that makes sense in this context.</li>
</ul></li>
<li><p>You can try it at <a href="https://python-minifier.com/">python-minifier.com</a></p>
<p><strong>Laís #3:</strong> <a href="https://pythonspeed.com/articles/stop-using-python-3.6/"><strong>It’s time to stop using Python 3.6</strong></a></p></li>
<li><p>Python 3.6 is reaching the <a href="https://pythonspeed.com/articles/stop-using-python-3.6/https://endoflife.date/python">end of it’s life</a> in 1 week and 1 day (Dec 23rd), i.e. no more releases after it.</p></li>
<li>You should care because the Python dev team will no longer release security updates for 3.6 ??</li>
<li>if you use Linux, you have a bit more time BUT security updates will be released and bug fixes will not.</li>
<li>also, Python 3rd party libraries and frameworks will drop support for 3.6 soon enough. <em>See the</em> <a href="https://twitter.com/WeldPond/status/1469313738029289476?ref_src=twsrc%5Etfw"><em>log4j issue and Java</em></a><em>.</em></li>
<li>Brian might like this one: <a href="https://twitter.com/anthonypjshaw/status/1469952485687107584">Grype - a vulnerability scanner for container images and filesystems</a></li>
</ul>
<p><strong>Michael #4:</strong> <a href="https://medium.com/towards-formula-1-analysis/how-to-visualize-the-formula-1-championship-in-python-using-the-ergast-api-and-seaborn-ac2f88ae7248"><strong>How to Visualize the Formula 1 Championship in Python</strong></a></p>
<ul>
<li><a href="https://www.youtube.com/watch?v=7QJ-N-AQJYc"><strong>Race Highlights | 2021 Abu Dhabi Grand Prix</strong></a></li>
<li><a href="https://www.youtube.com/watch?v=aViLtXEtgqs"><strong>Formula 1: Drive to Survive (Season 3) | Official Trailer</strong></a></li>
<li>Wanting to get into Formula 1 data analysis, the <a href="https://ergast.com/mrd/"><strong>Ergast API</strong></a> is a very good starting point.</li>
<li>This tutorial will show you how to use data from the Ergast API to visualize the changes in the 2021 championship standings over the rounds.</li>
<li>Introduces <a href="https://pypi.org/project/fastf1/"><strong>fastf1</strong></a>: Wrapper library for F1 data and telemetry API with additional data processing capabilities.</li>
</ul>
<p><strong>Brian #5:</strong> <a href="https://github.com/jupyter/nbdime"><strong>nbdime</strong></a><a href="https://github.com/jupyter/nbdime"><strong>:</strong></a> <a href="https://github.com/jupyter/nbdime"><strong>Jupyter Notebook Diff and Merge tools</strong></a></p>
<ul>
<li>Suggestion from Henrik Finsberg</li>
<li>“you recently covered ‘jut’ for viewing Jupyter notebooks from the terminal. Check out ‘mbdime’.” (that was <a href="https://pythonbytes.fm/episodes/show/258/python-built-us-an-anime-dog">episode 258</a>)</li>
<li>So I did. And it looks cool.</li>
<li><code>nbdime</code> provides tools for diffing and merging of Jupyter Notebooks.
<ul>
<li><code>nbdiff</code> compare notebooks in a terminal-friendly way</li>
<li><code>nbmerge</code> three-way merge of notebooks with automatic conflict resolution</li>
<li><code>nbdiff-web</code> shows you a rich rendered diff of notebooks</li>
<li><code>nbmerge-web</code> gives you a web-based three-way merge tool for notebooks</li>
<li><code>nbshow</code> present a single notebook in a terminal-friendly way</li>
</ul></li>
</ul>
<p><strong>Laís #6:</strong> <a href="https://developers.redhat.com/articles/2021/11/17/customize-python-dependency-resolution-machine-learning#python_interface_and_prescriptionshttps://developers.redhat.com/articles/2021/11/17/customize-python-dependency-resolution-machine-learning#python_interface_and_prescriptions"><strong>Using AI to analyse and recommend software stacks for Python apps</strong></a></p>
<ul>
<li>thanks Fridolin!</li>
<li>Project Thoth: an open source cloud-based Python dependency resolver
<ul>
<li>ML (reinforcement learning) that solves dependency issues taking into consideration runtime envs, hardware and other inputs. Using Markov’s decision process.</li>
<li>“a smarter pip” that instead of using backtracking, precomputes the dependency information and stores it in a database that can be queried for future resolutions. Using pre-specified criteria by the developer.</li>
</ul></li>
<li>In summary:
<ul>
<li>Thot’s resolver uses automated bots that guarantee dependencies are locked down to specific versions, making builds and deployments reproducible;</li>
<li>the aggregated knowledge (reinforcement learning from installed logs) helps the bots to lock the dependencies to the best libraries, instead of the latest.</li>
<li>They are in beta phase but welcoming feedback and suggestions from the community.</li>
</ul></li>
</ul>
<p><strong>Extras</strong> </p>
<p>Brian:</p>
<ul>
<li><a href="https://pragprog.com/twelve-days-of-pragprog/">Pragmatic Bookshelf 12 days of Christmas</a>
<ul>
<li>Today, pytest book is part of the deal, nice timing, right?</li>
</ul></li>
</ul>
<p>Michael:</p>
<ul>
<li><a href="https://www.youtube.com/watch?v=kNXVFB5eQfo"><strong>My talk</strong></a> at FlaskCon is out</li>
<li>Firefox <a href="https://hacks.mozilla.org/2021/12/webassembly-and-back-again-fine-grained-sandboxing-in-firefox-95/"><strong>releases RLBox</strong></a></li>
<li>We’re all <a href="https://arstechnica.com/information-technology/2021/12/the-critical-log4shell-zero-day-affects-a-whos-who-of-big-cloud-services/"><strong>getting identity theft monitoring</strong></a> for 1 year for free :-/</li>
</ul>
<p><strong>Laís</strong>: </p>
<ul>
<li>Python Ireland’s <a href="https://www.meetup.com/pythonireland/events/281468322/">speaker’s coaching session</a> is on Jan 22nd</li>
<li><a href="https://learngitbranching.js.org/">Learning git</a> the visual way - cool for beginners, thorough explanations</li>
<li><a href="https://realpython.com/java-vs-python/">Good read</a> for Java devs who want to start with Python (by Real Python)</li>
</ul>
<p><strong>Joke:</strong> </p>
<ul>
<li><a href="https://twitter.com/GGreg/status/1469442136961695752"><strong>Janga</strong></a></li>
<li><a href="https://twitter.com/OfficialLoganK/status/1454130937730535424"><strong>Python (hellish) virtual envs</strong></a></li>
</ul>
December 15, 2021 08:00 AM UTC
Python Software Foundation
Georgi Ker Awarded the PSF Community Service Award for Q4 2020
Georgi Ker was awarded the Python Software Foundation 2020 Q4 Community Service Award.
RESOLVED that the Python Software Foundation award the Q4 2020 Community Service Award to Georgi Ker. Georgi has been instrumental in establishing PyLadies Global. She is also a PyLadies Bangkok organizer, a member of the PSF Diversity and Inclusion WG, and an organizer with PyCon Thailand and APAC PyCon.
We interviewed Georgi to learn more about her inspiration and work with the Python community. We also asked several of Georgi's close associates, including Iqbal Abdullah and Saranya Mohan, to share more light about Georgi's community efforts and impact on the community.
The Origin Story
What was your earliest memory of how you got into tech?
I was born and raised in Singapore. I picked up computer languages pretty much like how I pick up most human languages - self-taught. I speak about eight human languages and three-to-five computer languages.
The very first computer class I took was MS-DOS 5.0.
When I was 20, I migrated to France and got married there. It was only when I had my first child while creating a website for her on Geocities that I found all the limitations on the template and started fumbling around CSS.
Programming has always been more fun for me to explore since my income comes mainly from project management, business consultations, design, and digital marketing.
When I moved back to Thailand in 2018, I went to a hack night one day and met programmers coding in different languages, hanging out together. I was learning Ruby then, and the meetup organizer, Dylan Jay, introduced another Rubyist - Dan Itsara, to me.
Along the way, we got two more programmers - Cody Fox and Matt Meyer to join in, and we started our very first Ruby meetup in Bangkok.
That's when I started to get more involved in programming.
What was your earliest involvement with the Python community?
After a few meetups in the community, Dylan, a Pythonista, knew that I do design work, contacted me then to help them out with their new PyCon logo and some event posters.
The following year, I organized PyCon and managed the marketing and design section for PyCon Thailand 2019.
During ThaiPy meetups, I was usually either the only female or was one of the few female developers there.
Inspired by a talk from Lina Katayose (PyLadies Tokyo) at the PyCon conference 2019, I decided to start a PyLadies chapter in Bangkok along with Gatuk (Sudarat Chattanon) to help support the female developers in the Thai Python community. I also helped many young, motivated students from Chulalongkorn University set up CUPy on their campus, providing organizational guidance.
What drives and inspires you to volunteer your time and resources in the Python community?
Being an immigrant in Thailand, it is hard to find resources and support in English to learn more. And that is why I go to meetups.
Being a female, it can be intimidating to be surrounded by men when I want to learn more. I want to feel comfortable asking the dumbest question one can ever think of and not being laughed at.
Learning is subjective, and motivation coming from an individual can be limited. Python is an Open Source language.
There are no companies paying advocates to promote the language, yet the language is so commonly used by organizations worldwide. This is where a community can help. To motivate learning and help discover new methods to solve problems related to Python.
The key to learning without boundaries is access to resources and support. If there isn't one, I will help build it. If there is one, I will volunteer to help support it. After all, I will also benefit from the community when I listen to the talks and meet these people.
How has your involvement within the Python community helped your career?
I actually got to know the PSF team through Ewa Jodlowska. She approached me to help them design PyCon assets and PSF's anniversary T-shirts this year after seeing the posters I've created for International Women's Day in March.
Later in the year, Jackie Augustine invited me to submit the proposal for design assets for PyCon 2022 and 2023.
I got the project, and now I get to do the UI design, swags, and banners! It's cool to see people wearing your designs.
For my self-improvement, with the community's help, I also get to know where to find suitable ebooks and resources, and I get to know amazing people who support me while I am learning.
How has Covid affected your work with the Python community, and what steps are you taking to push the community forward during these trying times?
Wow!
I can totally relate to this question after leading PyCon APAC 2021. When we decided to submit our proposal to host PyCon 2021 last year, the pandemic hit hard and demoralized many PyCon organizers.
We decided to propose a hybrid - in-person and online - event with so many uncertainties. And it was tough because it seemed like you were organizing two events. Due to travel restrictions, we decided to make the event online.
Some PyCon APAC organizers couldn't find the manpower and resources to organize PyCon in 2020 and 2021. So we asked these organizers to nominate two-to-three speakers from their own country. This allowed everyone to participate without investing too many resources and at the same time allowed the conference to showcase diverse talents.
And there was the challenge of time zone differences. So to allow attendees to watch the talks at their own convenience and prevent speaking from waking up in the wee hours to give a talk, we proposed pre-recorded talks.
The Covid lockdowns have limited our mobilities, and studies have shown that people suffer from mental health issues. We invited health specialists to talk about mental health, computer-related injuries, posture, and pain. One instructor even gave a live yoga session.
Since PyCon APAC is a diverse community and English is not the first language for many, we had all our talks captioned to make it easier for everyone. We had volunteers moderating different language chatrooms, a 24-hour open space to meet and make new friends, an open mic for everyone to show off their non-coding talents, and a live DJ from Paris.
Covid has forced everyone to find solutions as soon as possible, but some things still require time.
Community leaders have to stay positive and help keep the community motivated.
Georgi Ker Impact Story on the Python community
Iqbal Abdullah, PyCon Japan, speaks on Georgi's contributions to the Python community.
Georgi's most significant influence is rallying the community in Thailand to host PyCon APAC in 2021. Through her leadership and hard work, she has cultivated a community in Thailand that was non-existent as it is right now.
Georgi is also a role model to many. She has shown that her unconventional background and life experiences do not deter her from having a career in technology, being accepted, and finally leading the community.
I am happy and proud that Georgi is being awarded the CSA - she deserves it!
Saranya Mohan also speaks on Georgi's impact.
One of Georgi's outstanding qualities is the ability to listen and understand the community's needs. For example, she noticed that Thailand does not have a PyLadies community group, and she created the PyLadies Bangkok group. There were also student volunteers for PyCon Thailand 2019, and they were interested in creating a Python user group within their campus. Georgi volunteered to help them set up this chapter, now known as CUPy - Chulalongkom Univesity Python User Group.
Thailand hosted PyCon APAC 2021, and Georgi was the conference lead. She came up with the idea of a community and health track and invited prominent speakers in their fields to talk about work-burnout, posture problems - which we are experiencing these days.
The Python Software Foundation congratulates and celebrates Georgi Ker.
December 15, 2021 03:20 AM UTC
December 14, 2021
Glyph Lefkowitz
Declaratively
This weekend a catastrophic bug in log4j2 was
disclosed,
leading to the potential for remote code execution on a huge number of
unpatched endpoints.
In this specific case, it turns out there was not really any safe way to use
the API. Initially it might appear that the issue was the treatment of an
apparently fixed format string as a place to put variable user-specified data,
but as it turns out it just recursively expands the log data forever, looking
for code to execute.
So perhaps the lesson here is nothing technical, just that we should remain
ready to patch, or that
we should pay the
maintainers.
Still, it’s worth considering that injection vulnerabilities of this type exist
pretty much everywhere, usually
in places where the supposed defense against getting catastrophically RCE’d is
to carefully remember that the string that you pass in isn’t that kind of
string.
While not containing anything nearly so pernicious as a place to put a URL that
lets you execute arbitrary attacker-controlled code, Python’s
logging
module does contain a fair amount of confusing indirection around its log
message. Sometimes — if you’re passing a non-zero number of *args — the
parts of the logging module will interpret msg as a format string; other
times it will interpret it as a static string. This is in some sense a
reasonable compromise; you can have format strings and defer formatting if you
want, but also log.warning(f"hi, {attacker_controlled_data}") is fairly
safe by default. It’s still a somewhat muddled and difficult to document
situation.
Similarly, Twisted’s logging system does always treat its string
argument
as a format string, which is more consistent. However, it does let attackers
put garbage into the log wherever the developer might not have understood the
documentation.
This is to say nothing of the elephant in the room here: SQL. Almost every SQL
API takes a bunch of strings, and the ones that make you declare an object in
advance (i.e. Java’s PreparedStatement) don’t mind at all if you create one
at runtime.
In the interest of advancing the state of the art just a little here, I’d like
to propose a pattern to encourage the idiomatic separation of user-entered
data (i.e. attacker-controlled payloads) from pre-registration of static,
sensitive data, whether it’s SQL queries, format strings, static HTML or
something else. One where copying and pasting examples won’t instantly subvert
the intended protection. What I suggest would look like this:
 1
 2
 3
 4
 5
 6
 7
 8
 9
10
11
12
13 | # module scope
with sql_statements.declarations() as d:
create_table = d.declare("create table foo (bar int, baz str)")
save_foo = d.declare("insert into foo values (?, ?)")
load_by_bar = d.declare("select * from foo where bar = :bar")
# later, inside a function
con = sqlite3.connect(":memory:")
cur = con.cursor()
create_table.run(cur)
save_foo.run(cur, 3, "hello")
save_foo.run(cur, 4, "goodbye")
print((list(load_by_bar.run(cur, bar=3))))
|
The idea here is that sql_statements.declarations() detects which module it’s
in, and only lets you write those declarations once. Attempting to stick
that inside your function and create some ad-hoc formatted string should
immediately fail with a loud exception; copying this into the wrong part of
your code just won’t work, so you won’t have a chance to create an injection
vulnerability.
If this idea appeals to you, I’ve written an extremely basic prototype here on
github and uploaded it to PyPI
here.
December 14, 2021 09:50 PM UTC